Monday, July 31, 2017

Tuesday's Giveaway Link Up- August 1, 2017


Welcome to Tuesday's Giveaway Link Up with your hosts Karen @ Tots and Me, Emily @ Emily Reviews, Shelly @ The Attic Girl, and Rena @ An Ordinary Housewife.

So glad you could join us as we share our giveaways on  Tuesday's Giveaway Link Ups. 

This link up will be posted Monday at 7 PM est. and run all week long! Make sure you stop in as often as you can to list your latest giveaways.

Here is how to use the Giveaway Link Up

1. Post your reviews and/or giveaways, as many as you have, be sure to add the end date (family friendly please)

2. Help spread the word about the giveaway link up by grabbing our button, Tweeting or posting on Facebook. (Not mandatory- but it helps get more exposure to your giveaways as well!)

3. Take a moment to enter any giveaway that strikes an interest to you!

If you would  like to follow the  hostesses, we will gladly follow you back! Simply leave us a message to do so.

Featured Giveaway
Thank you for linking up with Karen @ Tots and Me, Emily @ Emily ReviewsShelly @ The Attic Girl, and Rena @ An Ordinary Housewife.


Fun Fiction Friday - July 28, 2017

Fun Fiction Friday
July 28th, 2017

Welcome back to Fun Fiction Friday.

In my Fun Fiction Friday I share the books the older girls and I are reading, and a short review of a Young Adult or Juvenile book I have finished, if applicable. I will also ask the girls to tell me something they would like to share about the book they are currently reading. As I am also reading books for adults, I have started my book blog up again. A couple of weeks ago I shared my Friday Finds, Book Beginnings on Friday, and The Friday 56 in my Friday Fun post. I will also be sharing my reviews of any adult books over there. If I do, I will share links to those reviews in my Fun Fiction Friday post. 

I am currently reading two books. I finished the one from last week, The Land of Stories: The Wishing Spell by Chris Colfer. I decided I needed to put the other three aside for a bit because I have two books that need to be returned to the library pronto. 


The Castle in the Mist is another book I found on display in the library. It is a juvenile fiction book written by Amy Ephron, her first book for young people. In this story Tess and Max are sent to their aunt's English countryside village. There isn't a lot to do until Tess finds a key that unlocks a magical gate into a different land. I haven't started the book yet, but it sounded intriguing.

Unhooked by Lisa Maxwell is a book that I had out earlier in the year. This book is a young adult book. I had started it and was really enjoying it, but I had to return it, and didn't have a chance to take it back out until recently. This is another story of a magical realm, but this is one that has been heard of: Neverland. However, it is not the same Neverland that we know from the stories and movies. The main character, Gwen finds herself and her new friend Olivia kidnapped and taken to this strange Neverland. It isn't clear whether Pan or Hook are the villain. It isn't clear who Gwen can trust, if anyone. But she must do something to save Neverland, to find her way home, before she loses her memories of where she comes from.

I will have to share my book review of The Land of Stories: The Wishing Spell next week as I just ran out of time. 

Amelia finished Harry Potter and the Chamber of Secrets and has started The Prisoner of Azkaban. She is also reading a chapter book for Australia called Flat Stanley's Worldwide Adventures: The Australian Boomerang Bonanza

Tabitha finished the book I mentioned a couple of weeks ago, the American Girl History Mystery: Danger at the Wild West Show by Alison Hart. And she also finished another History Mystery titled Betrayal at Cross Creek by Kathleen Ernst. She zinged through her Australia chapter book: The Magic School Bus Expedition Down Under by Rebecca Carmi. And she loves the Rainbow Magic fairy books by Daisy Meadows. She zinged through Cassidy the Costume Fairy, Anya the Cuddly Creatures Fairy, Lizzie the Sweet Treats Fairy, Maddie the Fun and Games Fairy, Elisa the Royal Adventure Fairy, Eva the Enchanted Ball Fairy, and Hope the Happiness Fairy. Yes, she likes to read! Sure helps with earning dollars at Summer Reading Program. 

As I am so late in posting this "Friday" post, I will not worry about the girls sharing anything. I hope to get on a better schedule so I can actually share these posts on Friday. Because "Fun Fiction Friday" really does have a nice ring to it. Don't you think?

Thursday, July 27, 2017

Ready, Eager, Able & Determined to READ with The Crafty Classroom {A TOS Review}


I love finding new products to help the children learn to read. When the older girls were little, I was more apt to come up with my own activities; however, now that I am so focused on our main curriculum, I just don't have the time or energy to put together something of my own. So, when I was introduced to the Learn to R.E.A.D. Curriculum Notebook from The Crafty Classroom I was most definitely interested. Especially because it incorporates some of the same ideas I used with the older girls, such as using word families and slowly introducing sight words. In addition to the main curriculum, we had the chance to review the corresponding R.E.A.D Review Pack which consists of 28 early readers.


Both of these products are downloadable PDF files. 

Learn to R.E.A.D Curriculum Notebook

This curriculum is about 800 pages in length. It is a 36 week curriculum in both reading and language arts. Lessons are scheduled for four days out of the week. In the beginning of the book you will find a Curriculum Overview, Daily Schedule, Blends & Digraphs Week Schedule, instructions for the Interactive Notebook, pre-assessment pages, and a description of each of the daily activities, including pictures of what each type of page looks like.

Here is an example


The Daily Warm Up plus each of the Daily activities are fully explained on these pages. The Calendar and Daily Warm up includes writing first and last name, number of the day, plus time and weather. These are to be done every day. Then, each day of the week has unique activities in the following topics: Reading, Language, Handwriting, Activity/Game, and Sight Word.

On Mondays we are introduced to the new word family with the colored"I Can Rhyme Chart," which has the word family ending with several labeled pictures. The child then uses the "Letter Sound Chart" to blend the sounds together for the word family. For example blending /a/ and /m/ to make "am" or /a/ and /t/ to make "at." The child then completes the handwriting page which contains several words in the word family. The activity for Monday is the Playdough Mat which can be used in a variety of ways, we have used it specifically for playdough so it can be reused. There are also word cards which we have used as flashcards. 

On Tuesdays the child is to use the "Sound it Out" page to review the sounds, practice blending them, and deconstruct them by picking out the first, middle, and ending letter for phonemic awareness. There is then a grammar page to go in the Interactive Notebook. The handwriting assignment is also a fun word search (which Harold loves). There is also more handwriting practice with the "Spinner Winner" game. Tuesday's sight word work is a dot painting and dot-to-dot activity. 

Wednesday's reading activity is called "Read & Respond" where the child reads sentences and then has to circle the word (out of a choice of two) that goes with the picture. There is also a short sentence to write. Then the child gets to glue letter tiles under pictures to build words. Handwriting is practiced with the fun "Nonsense Words" page, where the child is to take several letters and add them to the word family ending. The resulting "word" is then added to the "Real Word" or "Nonsense Word" column. The activity for the day is the "Find & Color" page which consists of the word family template which is filled with black and white images. The child is to find the images that end with the week's word family. Then they are to write three of the words on the lines. For sight words there is maze. The sight words are found inside the maze and the child has to follow the path which will allow them to "catch" all their sight words. 

On Thursday, the final day of the week, the child has a "Story Reader" which is comprised of four pages, which includes a cover/title page. This short story includes only words the child has learned, focusing on the word family words plus sight words. As more word families are learned throughout the year, more words will be included in these stories. The language activity is another interactive grammar page. For handwriting, the child will have a simple, guided writing prompt which can then be cut out and added to the Interactive Notebook. The activity for the day is a Word Family Crown. And finally, for sight words, the child looks at the second sight word of the week and has some fun with it, counting how many letters, syllables, vowels, and consonants it has, plus writing a word that rhymes with it, and writing it backwards. 

Every fifth week there is a Blends/Digraphs Week. This allows the child to learn additional sounds to add to the word families. This schedule is different in that there is a new blend each day. So, for each day's reading the child is to use the blend chart, which is like the "I Can Rhyme Charts" from the word family weeks. Then there is a page where they are to blend to read, like the blending of the sounds on the "Letter Sound Chart" but actual words are read and then written. There is a "Find & Color" sheet which not only includes finding pictures that include the blend, but also have blends printed around the page for the child to find and circle the correct one.

There are also two activities that alternate during the blend/digraph weeks. On Monday and Wednesday there are "Draw and Write" pages, plus "Science Sequencing" pages. On Tuesday and Thursday there are "Nonsense Word" pages and "Sort it Out" pages. 

This blend/digraph week also utilizes the other product we received, the R.E.A.D Review Pack. 


These early readers can be used alone or as a part of the curriculum. They are designed to be read every fifth week, after a group of four word families. As new blends/digraphs are taught during this week, the stories can also include words that have these blends/digraphs. There are four new books each review week for a total of 28 early readers. 

Each book prints out on three sheets of paper and, once it is cut out, contains 12 pages.


The first page of each book contains a box to review the word families and a box to review the sight words learned over the past four weeks. 


The remaining pages contain the story, told in short, easy to read sentences. The pages of the earlier books have 1-2 sentences per page.  


By the end of the curriculum the children are reading longer stories, with smaller font, and 3-5 sentences per page. 

How did we use the Learn to R.E.A.D. Curriculum Notebook and the R.E.A.D. Review pack?

I'm glad you asked. 

I have been printing out a week's worth of work (one word family) at a time, and adding it to Harold's binder. The teacher information is in the front pocket and he has a zippy bag for his flashcards. As we didn't have a notebook to use as an Interactive Notebook for language arts, I created a separate section at the back of the binder out of card stock. We just glue his grammar work on those pages, along with his writing prompt work. 


Harold starts out his school time by working on the Calendar and/or the Daily Warm Up. As it is the summer, and we haven't been having official school days until recently, I figured he didn't need to do these every day. 

I print out one calendar page per month and then write in the month and year at the top, plus the date up through the current date. I then put it in a plastic cover. Harold is responsible for tracing the dates and writing what today is at the bottom of the page. 


I love the Daily Warm-Up page because it gives him a little bit of math as well. We work on a number of the day. First he writes the numeral, then he has other ways to explore the number: tally marks, ten frame, money, writing the number word, and figuring out one more, one less, and ten more. He's actually impressed me when it comes to that. He has been able to answer the "ten more" correctly almost every time. 


I love that we have been able to look at different coins and work out what each one is worth, exchanging money when needed. 


Then there is time, both analog and digital, to work on. I show him the time on my phone, he writes that first, and then we work out the analog clock together, practicing counting by 5. 


And he gets to look out the window to check the weather, plus look at the thermometer to see what the temperature is.

Moving on to the reading portion of the curriculum.

He starts each week by working on the handwriting page. I have tried to encourage him to write neatly by telling him he will only have to write the word a couple of times if he does so.  If I notice he is struggling with a specific word or letter, I have him write extra. There are actually quite a lot of chances to work on handwriting in this curriculum, which is actually his least favorite part, so I pick and choose which ones he has to do, sometimes mixing up the week's work so he doesn't have to do so much writing per day. Though he isn't too fond of the handwriting, I am delighted to say that it is helping him to write more neatly.


I love that there are multiple ways to work on forming words. In addition to the handwriting, he gets to form letters out of playdough:


and glue tile letters underneath pictures:


And I think one of his favorite ways has got to be the dot letters and dot-to-dot sight word pages. We use markers or q-tips with paint for him to dot the word.


In fact, I print out extra of this page because Hannah likes to use it as well.

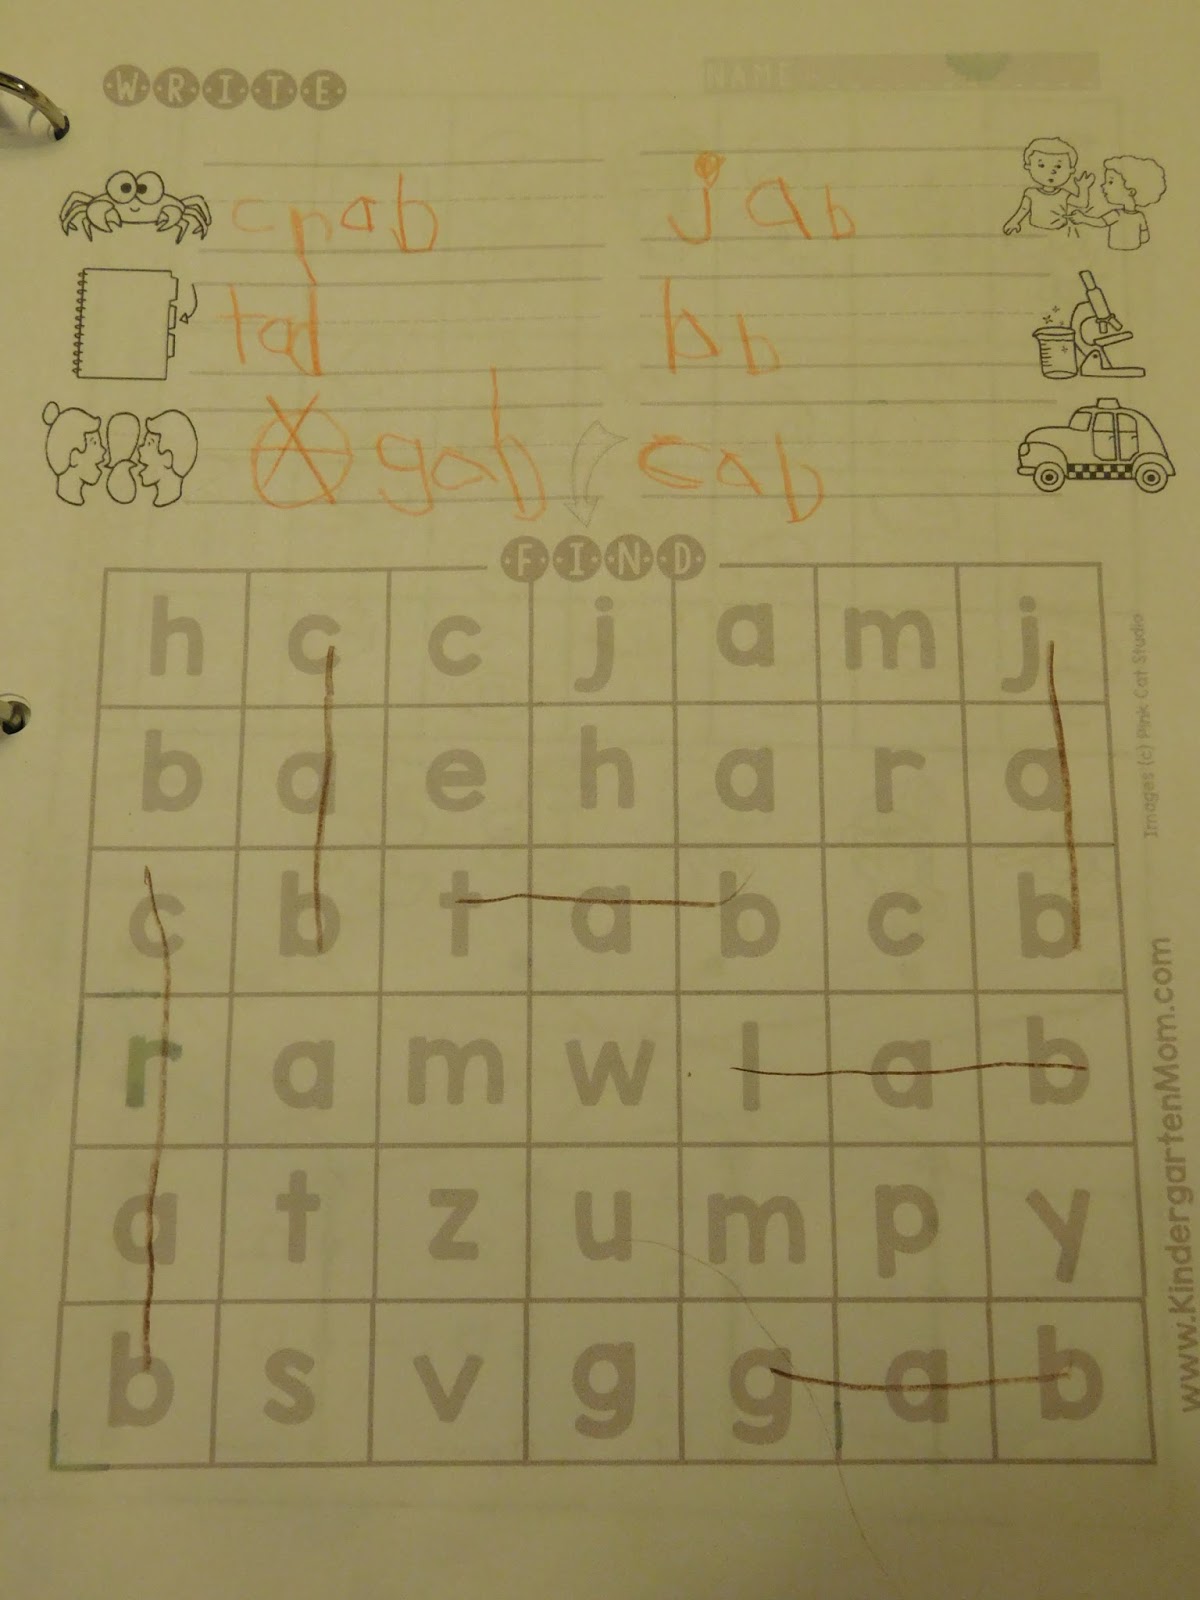
Even using the Word Finds give him a chance to form the words.


I also appreciate that he has the opportunity to deconstruct the words with the "Sound It Out" pages. He has to say the word that is pictured and circle the correct beginning, middle, end letter. This is after he blends the sounds together to read and find the word.


Here's a look at a finished week. He was quite proud of his work.


In fact, he LOVES those crowns. He's been known to wear it when we go out to the store or the library. He also thinks it is quite fun to wear more than one at a time. But, he can't get very far with them balanced on his head.


We are currently on the first blend week. During this week Harold is learning the blends "bl" "fl" "gl" and "sl." 

Here is a look at one day's worth of blend work:


He is also reading the readers for week 5.


Additionally, he is getting an introduction to simple grammar concepts in an interactive way.


The Learn to R.E.A.D Curriculum Notebook and R.E.A.D Review Pack combine to make a wonderful learn-to-read program plus so much more. I love that it uses word families, having to add the beginning sound onto the ending that is the same for all the words they are learning at the time, which also helps them learn about rhyming. The inclusion of a couple of sight words a week is great because they child gets to learn words that don't follow the phonics rules but are needed for sensible beginning sentences and stories. 

I love the way the program is structured, and that there is a combination of worksheet assignments and hands-on manipulative work. 

I also appreciate that it is much more than just a reading program. Harold is getting to practice his handwriting, plus work on math, some simple science concepts, grammar, and creative writing. 

I highly recommend this program for young children who know their letters and sounds, those who are ready to start blending the sounds together to form words and sentences. 

You can find The Crafty Classroom on Facebook, Twitter, Pinterest, and Instagram.

The Crafty Classroom offers a lot more than just these Reading products. In fact, my fellow Crew Mates have been reviewing a variety of materials. There is an Alphabet Curriculum Notebook, and a Bible ABC Curriculum Notebook for preschoolers, plus a USA Activity Bundle, and How to Write a Paragraph for older elementary children. Click on the banner below to check out the reviews of these different products.

Crafty Classroom {Reviews}

Crew Disclaimer

Throwback Thursday Blog-Style #162: July 27, 2017

Welcome back to... 


I know, I know, Throwback Thursday seems to be all about sharing pictures from the past, great memories that mean something to you, that you would like to share with others. At least that is how it appears to me. Throwback Thursday wasn't something I was participating in, and then I came up with an idea.

I thought it would be great fun and a help to my blog to share old content, but not just any old content. Each week I will share an old blog post from a previous year, any year, BUT it has to be from the current week (for example, something I've posted around July 27th, from any previous year)  I will go in, edit the post if needed, add a pinnable image if I don't already have one, and share it on Facebook.

Last year I focused solely on recipe posts for the posts I wanted to share, and the year before that, I shared past review posts. It was fun remembering some of the recipes and reviews I had forgotten about. This year I will be sharing random posts.

Would you like to join in? You do not need to edit your past post in any way, you don't need to create a pinnable image, though it couldn't hurt, in fact it will help your blog traffic to add quality pinnable images to your posts.

Just go into your archives, choose a favorite post from this current week from any previous year, and link it up below. (If you don't have anything from this current week, it is still okay to link up with a post from a previous year around this time. And if you haven't been blogging for a full year, feel free to share any earlier post.)


Please make sure to share from the past as instructed above if you would like your post to qualify for the Featured Post. Most weeks I find that there is a wonderful post, but I can't feature it because it is a current post, not from the past. I love reading the current posts, if you want to share them. However, I am not able to feature them, because the spirit of Throwback Thursday Blog-Style is to share posts from the past.
Thank you

I will be pinning posts to my appropriate Pinterest boards and will be randomly selecting a Featured Throwback Thursday post to share next week. Just a note, I will be sharing a picture from your post if you are selected as the featured post, but I will link back to your post. I will ALWAYS give credit and link back. By linking up you are giving me permission to use your picture in the post. 

Here is my Throwback Thursday post:

Here is this week's randomly selected
Featured Throwback Thursday:

Joy from Joy's Jots, Shots, & Whatnots shared Flat Out Bowl Holders from Wash Cloths.


To participate, link up below. It would be great if you could visit several of the other posts that have linked up. Stop by, comment, and pin images so we can help each other.

No button currently, and there won't be one until I can figure it out seeing as Photobucket has changed things. Feel free to still share the picture in place of the button. Just link it to my Throwback Thursday Blog-Style permalink please.


Happy Throwback Thursday!


Wednesday, July 26, 2017

Getting Artsy with Products from ACTÍVA {A TOS Review}


We love getting artsy here in our house. Sadly, there isn't near as much time to do so these days. So, when I discover products that can allow us to get creative but are also not very time-intensive, I have to admit, it piques my interest. Such was the case with these materials from ACTÍVA Products. Thanks to the Homeschool Review Crew, we were able to review the Rigid Wrap and CelluClay Quik-Sculpting Kit which allowed us to make a really neat project. There are project ideas included in the box, plus they have a free ebook called ACTÍVA Products' Favorite Sculpture KIDS CRAFTS available on their website. We took their ideas and tweaked them, which tends to happen often in this house.


We were so excited when our package came in the mail. In fact, I think I was more excited than the children.


Let me start by explaining what Rigid Wrap and CelluClay are. Both of these products were included in the Quik-Sculpting Kit, though they can be purchased separately as well. 


There were 2 rolls of 4 inch by 5 yard Rigid Wrap. The Rigid Wrap is gauze coated in plaster. Once it is dipped in water, the plaster becomes moist and pliable. It can be used in multiple ways. We chose to use it to wrap a cardboard template, similar to the instructions given for making a butterfly; however, we made fish for an aquarium diorama instead. 

Also included was an 8 oz bag of CelluClay which is "Instant Papier Mâché." This is not a powder, which I assumed it was because of the powdery film that was in the box. It appears to be a mixture of plaster and recycled paper bits, which are to be mixed with water to make a clay-type material to mold. 


Like the Rigid Wrap, the CelluClay can be used in different ways. We chose to use the idea for the dinosaur that is included in the free ebook, but made starfish to go in our aquarium instead.

Now that I have shared a little bit about each product, let's take a look at how easy they are to use. (Very, very big bonus for this busy homeschooling mom!!)

We started by making some Garibaldi fish and Senorita fish to go in a Kelp Forest aquarium. As I mentioned, there are instructions for making a butterfly using these same techniques. In fact, instructions for the butterfly are on the box, in the included instructions, and in the free ebook. 

I found templates online for both of these fish, printed them out, and cut them out of thick cardboard. 


I unwrapped one roll of the Rigid Wrap, got a bowl of water ready, and cut the Rigid Wrap into strips.


The children dipped the strips into the water, letting some of the water drip off while running it between their fingers, and then placed it on the cardboard template, wrapping it around, and smoothing the plaster.


This was quite easy to work with. Here you can see Tabitha and Hannah smoothing out the plaster with their fingers. 


They wrapped one layer on, then a second layer in a slightly different direction. The Garibaldi fish needed to look "plumper" so we added another piece of cardboard on each side and wrapped more Rigid Wrap around it. Then we added scrunched up Rigid Wrap for the side fins.


Amelia did have some issues with the strips occasionally curling in on themselves and she couldn't unwrap them to use them. Plus there were some sections that didn't want to become pliable. For some reason they remained stiff, even when we left them in the water for a longer period of time. Other than that, we found the Rigid Wrap very easy to work with, much easier than other attempts we have made in the past with other materials to make papier mâché projects. In comparison, this product made very little mess. Yes, the newspaper was needed, but it was easy clean up.

Four fish drying so they can be painted:


Once they were dry, the children painted them, along with a cardboard box for the aquarium. We used bottled acrylic paints, our go-to paint.


The dried Rigid Wrap was a very easy surface to paint on.


Our aquarium partially finished:


I decided we would make starfish to put on the bottom of the aquarium. This was mainly so we could get a chance to use the CelluClay with this project. As I mentioned above, there is a dinosaur project in the ebook that uses CelluClay. I thought it would be fun to use these instructions to make the starfish.

We needed a few more materials to use the CelluClay than we did for the Rigid Wrap. In addition to a cardboard template, the CelluClay and some warm water, we needed wax paper, a plastic zippy bag, plastic wrap and a rolling pin. The instructions in the ebook didn't actually mention the wax paper, but when I was reading up how to use the CelluClay on the website, it stated we needed a Formica or waxed paper working surface. So, to the store to buy wax paper we went.


I found instructions for mixing the CelluClay in the Instructions, Tips and Techniques Sheets under the Learn tab on the ACTÍVA website. There you can find instructions/tips for ten of their products.

I placed approximately half of the enclosed CelluClay in the zippy bag and added some water. I used a little at a time, figuring it would be easier to add additional water, than having to add more CelluClay. Yes, the amounts were given in those sheets I found, but it was for a different amount of CelluClay than what we were using, plus I'm not exactly sure how much we actually used (it looks like about half).

We took turns smooshing it in the bag until the water was incorporated into the product and there were no dry spots left.


It was quite moist, but not too sticky.


I'm not sure why the instructions said to roll it out between two pieces of plastic wrap, but roll it out we did. Though I used the wax paper that was already on the table instead of the plastic wrap. That was a mistake. It got the wax paper way too wet plus it stuck to it. So, instead of saving money and time, I ended up having to put more wax paper down for Tabitha. Oops, next time, we will follow the directions.


As I said, I'm not quite sure what the purpose was of rolling this out, as we just needed to take pieces of it to cover the cardboard starfish.

The children each had their own technique for covering the template.


Tabitha smoothed hers out a lot more than her siblings did. Harold smoothed his out the least, sort of just clumping pieces of CelluClay on. All in all, they turned out okay, but I do wish it wasn't so lumpy.

It is recommended to dry the product on a rack so it can dry evenly.


The next day, the starfish were painted.


One thing I had forgotten to do was make a hole in each fish for the string so they could be hung up. I emailed the company and received a prompt reply, telling me that we could drill a hole in them. I had been concerned that trying to bore a hole would make them crack. We actually don't have a drill, so I used a screwdriver which worked quite well. We did have to add a touch more paint to the holes to cover the plaster that was showing through after I bored the holes. I have to give credit to Tabitha for that ingenious idea.

So, we ended up with eight sea creatures ready to go into their new home.


Our Kelp Forest Aquarium


I have to say, if it hadn't been for this review, I know we wouldn't have come up with such a neat craft. If anything, the fish would have been made out of construction paper and glued on. I have no idea how I would have made 3-D figures without these products. The results are really cool, though a bit lumpy in places, especially the starfish made with the CelluClay. If we  had to choose, I would have to say our favorite product is the Rigid Wrap 

In order to make this aquarium, we used a little over half of the Rigid Wrap and about half of the CelluClay. So, I will have to think of another project to make with the CelluClay to try it again, to see if we can get our figure will have less lumps. The hubby suggested perhaps a bit more water. I already know what we are going to do with the remainder of the Rigid Wrap. There is an Egyptian Sarcophagus project in the free ebook that will go perfectly with our study of Egypt in the fall. 

Regardless of the few issues we had, these products from ACTÍVA are great art materials. They really allow children to make some neat projects. I love the look of some of the other ideas, but a couple of them are a bit more advanced. (I do appreciate that the ebook has the projects leveled: beginner, intermediate, and advanced.)

You can find ACTÍVA Products on Facebook, Twitter, Pinterest, and Instagram.

Don't forget to check out the reviews of my fellow Crew Mates. I can't wait to see what they all made.

Rigid Wrap and CelluClay Quik-Sculpting Kit {ACTÍVA Products Reviews}

Crew Disclaimer
Related Posts with Thumbnails