Showing posts with label unit study. Show all posts

Wednesday, April 24, 2019

Digging Into Ancient Rome with Online Unit Studies from Techie Homeschool Mom {A TOS Review}


Sometimes we just want to have some fun as homeschoolers. That might mean doing a bit of a review of material we recently learned to try out a really, really neat online curriculum. If you have been reading my blog for a while, you may know we started out this year learning about Ancient Rome. Though we have moved past that time period, I was quite excited to have a chance to review the Ancient Rome Online Unit Study from Techie Homeschool Mom. Thankfully, the children agreed, especially when they saw the fun hands-on projects that were involved. 


Personally, I was always more of a "notebook and paper, I'd still rather read a physical book, and computers still make me nervous" kind of gal. However, I realize times are changing, and the children NEED to know how to use technology. Honestly, it isn't that the children are not familiar with computers and such. We have been using some websites to help supplement their schooling since Tabitha was a preschooler. These days they use the computer daily for various subjects, they play on game systems, and since Christmas of last year they even have their own tablets. Something about these Online Unit Studies intrigued me, as I am a big fan of unit studies, and wasn't quite sure how that would translate into a digital curriculum, so I thought it would be fun to try it out. And I am so glad we did. 

Each of the Online Unit Studies that are available from Techie Homeschool Mom are self-paced courses, meaning a family can take as long as they need to complete them, without losing access. There are a variety of different courses available. You will find courses in history, science, social studies, holidays, art, and more. As members of the Crew, we were given the choice between seven different courses:
  • Ancient Egypt Online Unit Study
  • Ancient Greece Online Unit Study
  • Ancient Rome Online Unit Study
  • Famous Artists Online Unit Study (Vol. 1)
  • Famous Artists Online Unit Study (Vol. 2)
  • Famous Inventors Online Unit Study
  • Solar System Online Unit Study

While I would have loved the chance to have checked out the artist or inventor studies, I had noticed that there were quite a few trickier-to-come-by supplies needed for the hands-on projects. So, even though it meant a bit of review, I decided to go with Ancient Rome.


I was pleasantly surprised that we have actually been learning quite a bit of new information. I have to tell you, this unit study is chock-full of learning in the eight modules that it is comprised of. Each module is broken up into a number of lessons, ranging from 3-8. There are videos to watch, articles to read (or sometimes listen to), quizzes to take, projects to complete, recipes to make, games to play, and books to read. Here is a list of the different modules:

  • Introduction to Ancient Rome
  • Roman Mythology
  • Daily Life in Rome
  • Roman Architecture and Engineering
  • Roman Government
  • The Roman Language
  • Entertainment in Ancient Rome
  • Roman Military and War
In addition to the lesson modules there is a "Before You Start..." section with the following helps:
  • If this is your first Online Unit Study
  • Project Supplies
  • Book Club
  • General Questions/Broken Links
Then there is information about the Unit Study Project, which in this case was a Quiz Game App called Heads Up. 

We have made it a little further than halfway through the study in the five weeks that we have had it. 

These unit studies are designed for children from mid-elementary to middle school age, so the older girls probably would have been fine navigating the program and working on the material independently. However, we have always worked on history together, and they are already working on several subjects independently during their computer time, so I decided to work on this together as a family.

Once I had access to the unit study, we sort of dug right in. I did neglect to read the "Before You Start..." information in depth originally, though I did glance at it. Thankfully the study is quite easy to figure out and navigate, so I didn't run into any problems. I did go back and read the information when I had some free time, and realized I had been doing everything correctly. It really is self-explanatory. (Remember, this is coming from someone who gets nervous around computers, and can feel overwhelmed on new websites.)

We would do approximately one lesson from a module each time we sat down to learn about Ancient Rome (or review as the case was on occasion). Sometimes the lesson was short, so we did another one, and sometimes it was a bit long, so we spread it out to a second day. So far we have done a total of 19 lessons, though there are a couple of projects that still need to be completed. 

For our first lesson we got to discover where exactly Rome, Italy is, and we got to use Google Maps to see how far away we are from it. I honestly did NOT know you could measure distance using Google Maps, so that was sort of fun.


We then got to watch a fun video about the history of Ancient Rome and the Byzantine Empire, plus we looked at a timeline and answered a 10-question quiz. 

Quite a few of the links in the lessons lead to these fun articles and quizzes. I also like that with some of the articles on this site you can have the article read to you. It's sort of nice to save my voice, and it allows me to pay better attention to what is being read.


Usually there is a space at the bottom of the article to leave a comment in reply to a question or two posed at the end of the lesson. However, if there is a project to complete or a recipe to make, there is no comment thread. The reason for this is, when the project/recipe is finished, you are supposed to take a picture and share it on Pinterest and Instagram. Thanks to this I learned how to pin just a picture without it being inside a blog post. And I decided to teach the children how to make pinnable images. I will say, I sort of wish these lessons still had comment threads. That way we could note how our project went and post any suggestions or tips. 

We've had to answer such questions as:
  • Share the distance from your home to Rome, Italy.
  • What did we think of Aeneis and the Aeneid?
  • How did the worship of ancient Romans differ from other ancient religions?
  • What things were different for the ancient Romans than today? What things are similar?
So far the children's favorite parts have been making the different foods. We made a Roman Honey Cake while learning about food in the "Daily Life in Rome" section. We also chose to make the Edible Roman Road when learning about Roman Roads in the "Roman Architecture and Engineering" Section. I actually posted a Kids and a Mom in the Kitchen post for the Roman Honey Cake. It has been ages since I have posted one. I'll also be posting our Edible Roman Road this weekend. 

Roman Honey Cake


Edible Roman Road


Here is the collage Amelia made:


And here is Tabitha's pinnable image:


And here are mine:


We have also started working on a model Pantheon using craft sticks, hot glue, a balloon, and paper mache. It was put on hold as we didn't have a balloon. Plus we are having a bit of trouble following the video as the instructions are not very clear at all. We also haven't had a chance to go outside to make a sundial to tell time like the ancient Romans because we need to find a compass. That, and the weather has been a bit cloudy and rainy lately. 

The children are also in the middle of building a couple of colosseums on Minecraft. We aren't quite sure how long it is going to take to finish them. Tabitha and Amelia have been working together, while Hannah and Harold have been working on theirs. 


In addition to the lessons and projects, the Unit Study requires us to choose at least one fiction book on Ancient Rome to read. I actually had the children each choose their own book, plus we are still trying to get through Twice Free by Patricia St. John, which we have been reading as a read aloud for quite some time. Tabitha chose to read Detectives in Togas by Henry Winterfeld, and then she started the sequel titled, Mystery of the Roman Ransom. Hannah read Magic Tree House: Vacation Under the Volcano, which is about Pompeii. Harold is slowly making his way through the Magic Tree House books in order, and is getting close to being able to read Vacation Under the Volcano. Finally, Amelia chose a couple of books to read which I had taken out of the library. The first is titled, The Roman Twins by Roy Gerrard and the second is The Roman News by Andrew Langley. At the end of each module we are asked different questions about the chosen books. 

And to help us review information about Ancient Rome, we have been using the Heads Up app with the Build Your Own Deck in which we add lots of words regarding Ancient Rome. So far we have added 34 words. We did have to pay 99 cents for this specific deck. Not a big deal, just thought I would mention it. We aren't ones who usually pay money in apps. 

Here we are playing the game. 


Even mommy and daddy enjoy taking turns.


Here's a look at some of the words we've added:


Just a note, my husband and I are keeping this app on our phones, but we are not allowing the children to have this app on their tablets. There are some iffy, more adult decks that are included in the free ones which we do not want our children to have access to. However, we have been having a blast playing the one on animals. 

We are really enjoying using the Ancient Rome Online Unit Study from Techie Homeschool Mom. I really appreciate the time she has put into this study to make it easy for us to just click through to learn some awesome information about Ancient Rome. The site is easy to navigate and not at all overwhelming. I also love the way the site keeps track of our progress (as long as we remember to click "Complete and Continue" of course). I am very thankful for the General Questions/Broken Links section of the site. I have had to ask a question and I have had to report a broken link. Beth replied quite quickly and she fixed the link for the "Tell Time Like an Ancient Roman" project right away. Additionally, I love the way she has incorporated hands-on projects with a primarily digital, online study. It really does help to break up the screen time. Granted, if you are a parent who doesn't want your children online or in front of a screen too much, this might not be the curriculum for you. However, we have been incorporating educational websites for years, and I feel this unit study is well worth having some extra time online.

So, do I recommend the Ancient Rome Online Unit Study from Techie Homeschool Mom?

I most certainly do! I feel it has been a great addition to our homeschool, and I'm sure it will be to yours as well. You aren't interested in learning about Ancient Rome? That's okay. Don't forget, she has Online Unit Studies for multiple subjects. Maybe you will find one that fits your needs.

You can find Techie Homeschool Mom on Facebook, Twitter, Pinterest, YouTube, and Instagram.

Don't forget to click the banner below to see what my fellow Crew Mates thought of the different Online Unit Studies they reviewed. 


Solar, Ancients and Famous People Unit Studies {Techie Homeschool Mom Reviews}

Crew Disclaimer

Friday, April 19, 2019

Kids and a Mom in the Kitchen #129: Roman Honey Cake

Time for Kids and a Mom in the Kitchen


It has been a long, long time since I posted a Kids and a Mom in the Kitchen post. We are still in the kitchen together, but we never really have new recipes to share. And the older girls are always coming up with new recipes from scratch. Without mommy's help. Once they get their recipes perfected, I will be posting them, but that will be Kids in the Kitchen, not Kids and a Mom in the Kitchen. My children are growing up!

I have the opportunity to come to you today with a Kids and a Mom in the Kitchen thanks to a review we are doing. We have been reviewing the Ancient Rome Online Unit Study from Techie Homeschool Mom. In fact, that review will be going live next week. We have been doing some great learning online, but there are also great hands-on projects. One of them was to make a Roman Honey Cake. Yum, was it tasty!

The original recipe can be found at Cookies, Cupcakes and Cardio.

It was so easy to make. Just three ingredients.


You'll need eggs, honey, and flour.


First the three eggs were cracked into a bowl. Then the children took turns beating them with an electric beater until they formed peaks.


Then we added the honey.


We beat it until it was mixed well. Then we slowly added the flour and folded it in.


I had never beat whole eggs until they formed stiff peaks before. I was also surprised how much this made from only 3 eggs, 7 oz of honey, and 2 oz offlour.

We then poured it into a 9 inch pan which I had greased and had a circle of wax paper placed onto the bottom.


All ready to go into the oven. It was baked at 330 degree for 40 minutes. 


Doesn't it look tasty?


I loosened the sides, turned it over onto a plate, and removed it, then I took off the wax paper.


We loved the sound of topping it with whipped cream (which we made from scratch) and drizzling it with honey.


If you go to the original post, you can watch a video of her making the cake. Though, it really wasn't difficult at all. I have got to make this for a fellowship meal sometime soon. Though, I am sure I'll have to make two.

I am linking up to:

Friday, April 5, 2019

Learning About Life Cycles: Tadpole/Frog Lessons

Learning About Life Cycles

A unit of preschool ideas 
on Life Cycles

Welcome to the first week of my Learning About Life Cycles unit.

Like my Arctic Animals and Hibernating Animals lessons, both weeks will feature books I recommend to go with each topic, a craft or two, songs, motion rhymes/finger plays, activities/games and even snack ideas. 

This is the schedule:

Week 1: Tadpoles/Frogs
Week 2: Caterpillars/Butterflies

I do not think we will be doing any other animals as we are getting close to the end of our co-op year. Hopefully I will get a chance to teach this Pre-K class again next year, so I will be able to bring you more fun lessons. 

We continue to start each class with the song "Good Morning to You." We did continue to sing our "Did You Ever See a Polar Bear?" song and recite our "The Snow Fell Softly" poem, but that was only to practice for the end of year program, so I'm not going to include them with my Life Cycle Lessons posts. Instead, I am going to share the Spring song I came up with for us to sing these last few weeks, plus the tadpole/frog songs we sang. In the Caterpillar/Butterfly post you will find relevant songs.

Flowers are growing

(To the tune of Running over)
by Karen Waide

Snow is melting, flowers growing

Spring is here the flow’rs are growing

It feels warm to me

I’m as happy as can be

Spring is here, and flow’rs are growing


These lessons actually took place over a period of three classes. We had one class per week, one craft each week plus songs, activities, and books.  

Tadpole/Frog Lessons


Here are the books we used for our lessons:

Week 1:


Fabulous Frogs by Martin Jenkins


A Tadpole Grows Up by Pam Zollman is my favorite easy book about the frog life cycle. 


Jump, Frog, Jump! by Robert Kalan

Week 2:


From Tadpole to Frog by Jan Kottke


What Did I Look Like When I Was a Baby? by Jeanne Willis

Week 3:


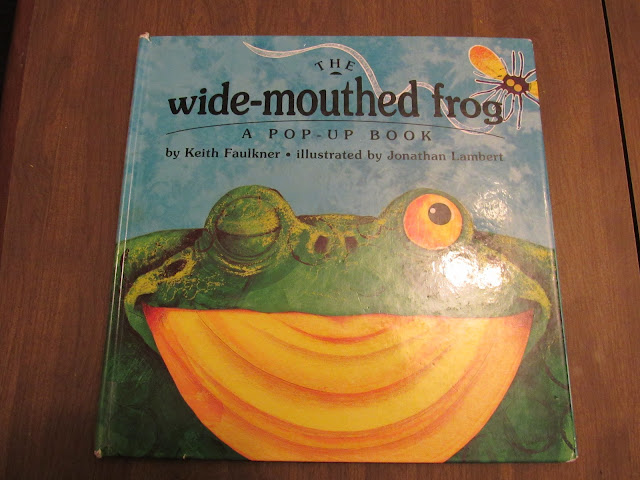
The Wide-Mouthed Frog by Keith Faulkner


Each of the first two weeks featured a frog life cycle craft.

Week 1

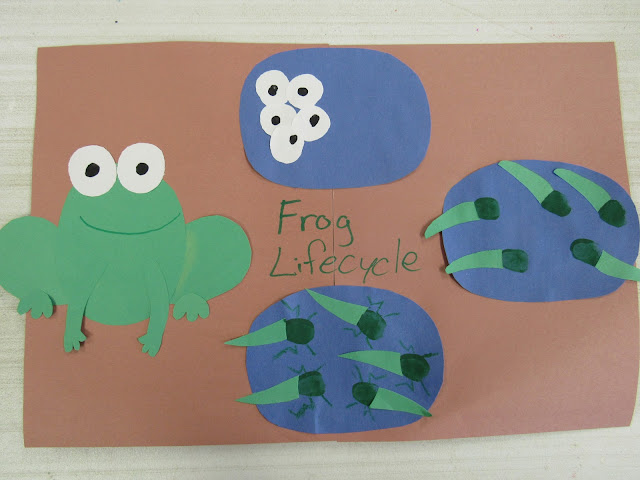
Frog Life Cycle Poster


You can find the details for this craft over in my Littles Learning Link Up: Frog Life Cycle Poster post.

Week 2

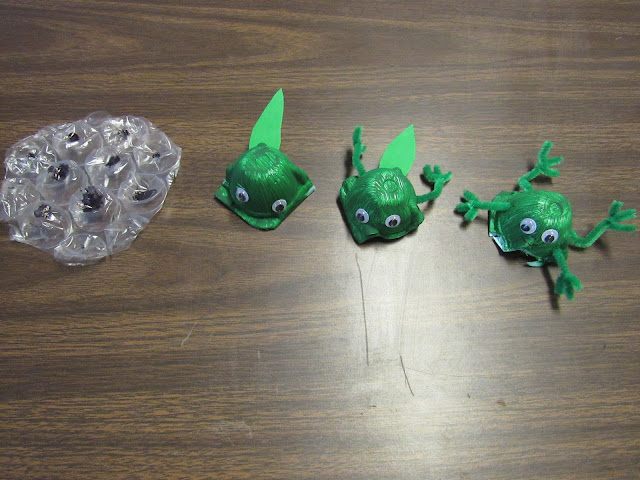
Recycled Frog Life Cycle in a Pond Habitat

Here are the different stages of the frog life cycle. We made them following the instructions in one of the posts that was included in my Frog Metamorphosis/Life Cycle Fun Round Up. Though the original idea over at Still Playing School didn't have three separate figures for each stage. She had it so a child could transform the tadpole to the frog and then do it over and over again. I decided I wanted the children to see each stage side-by-side, and I wanted to give them a little habitat which we made inside a box.


Week 3

Frog Lapbook

For our third week we made a Frog Lapbook instead of doing a craft. I used elements from different printables that were shared on my Frog Metamorphosis/Life Cycle Round Up. I'll link to each blog as I mention that part of the lapbook. 

We started out by making Life Cycle Flip Books. The top, title page is a 3x3 inch square, while each page is 1 inch longer than the one before. 


I had already cut out the different stages and the labels (which I found over at Living Life and Learning). My daughter Amelia helped me glue the labels on so we wouldn't run out of time during class. All the children had to do was find the correct picture and glue it onto the page. Then I stapled the pages together, and stapled the finished book to the inner left flap of the lapbook.


Next the children glued five lily pads to the center section of the lapbook. Then I wrote each number from 1-5 on their lily pads. Next I applied the corresponding number of dots of white glue to the lily pads, while counting the numbers. I used to do this with my children all the time to help with number recognition and counting. The children finished up by attaching the correct number of frogs. I just searched for a frog picture I liked, shrunk it down to about one inch in my word processing program, then copied and pasted enough times so each child would have 15. 


Fun With Mama has a Frog Life Cycle Learning Pack that included some counting puzzles. I cut out the puzzle of the frog eggs, but left the other stages complete so the children could see how they were meant to go together and also so they wouldn't have more than one puzzle in the pocket.


In order to make the pockets I cut out paper in the shape you see below:


Then the narrow part gets folded down (or up depending on how you are holding it). You need to fold the sides in and glue them down.


Then apply glue to the back, turn it over, and attach it to the right side flap. The cut up puzzle fits in nicely. I figured more than one could be stored at a time, but only after the children had time to work on one at a time. Which is why I only cut out the one (plus, I admit, I ran out of time to cut the rest. However, it worked out well this way)   


Then I flipped the lapbook over so we could add a "Parts of a Frog" illustration. These are a part of the Frogs and Their Life Cycle Unit Study from Life of a Homeschool Mom.


I printed out an already labeled copy to use as reference.


I had the words all cut out and spread them out in front of each child. Then I pointed to the part we were looking at and told them what it was called and helped them look for the correct word.


They then glued them on.


Activities

We tend to sing songs and do the activities while we are waiting for parts of our projects to dry.

Seven Little Speckled Frogs

I printed out some frogs to use with the "5 Little Speckled Frogs" song. Except I made sure I had enough frogs for each child, and when each frog jumped into the pool, one of the children took a frog and sat down with it. 


We sang this song the first week and the last week. We didn't have time during the second week. After we used it on the last day, I had the children take the frogs over to where I had set up another activity. 

Feed the Frog Race


I printed out 18 flies for each child (yes they are pictures of real flies), cut them out, and laid them on a blue sheet of construction paper (sort of like they were flying over the pond). Then I cut out strips of red paper and attached a folded over piece of packaging tape to the end. This was the sticky frog tongue. They were to hit the tongue to the flies and try to pick them up as fast as they could, removing them as they went and "feeding" them to the frog. I timed them for one minute to see if they could feed the frog all the flies.


I think they enjoyed it. We played it twice, but ran out of time to play it again.

Musical Lily Pads

Another activity the children have enjoyed is our Musical Lily Pads game. We played Musical Paw Prints when we learned about the polar bear, and Musical Icebergs with other Arctic animals. For the lily pads I just used green construction paper. This time I had them hop around like frogs, in between the lily pads, and then when the music stopped they had to hop on a lily pad.


Song

Tadpoles Swimming in the Pond

(to the tune of Mary Had a Little Lamb)
by Karen Waide

Tadpoles swimming in the pond
in the pond in the pond
tadpoles swimming in the pond
flitting here and there

hold one hand out in front of you and flit it back and forth like a fish

They will grow some legs real soon
legs real soon, legs real soon
they will grow some legs real soon
growing every day

tap your legs with your index fingers
last line put hands together and pull apart slowly

Soon their tails will disappear
disappear, disappear,
Soon their tails will disappear
What did they become?

Place hand behind back and flit back and forth, then quickly remove it and cover eyes
keep eyes covered
repeat
then shrug shoulders to question.

Now they can hop on land
hop on land, hop on land
now they can hop on land
they are now cute frogs.


Crouch down and hop repeatedly when singing the words "hop on land."

Snack

 I found this adorable idea for a frog life cycle snack because it is another one that was shared with me for my Frog Metamorphosis/Life Cycle Round Up. You can find the Edible Frog Life Cycle Snack over at Teach Beside Me.

I brought the foods with me and had the children put the life cycle stages together. The gelatin is made from unflavored gelatin made with water and lemon juice and honey (though I wasn't sure how much lemon juice or honey, so what I did use wasn't very tasty). The instructions said to form the gelatin in round molds, which I didn't have. So, I just made it in a pan and scooped globs out onto the children's plates. Then they stuck raisins in them.


The tadpoles were made by sticking small spinach leaves into the ends of grapes


Then we added shredded carrot for the legs on the froglet.


Honestly, aren't these the cutest. I couldn't pass this snack up.


Oh wait! It gets cuter. We used apples, grapes, and raisins to make the adult frogs. 

I cut an apple into quarters, then I cut a slit out for the mouth. In order to make the eyes the children stuck half a grape on a piece of toothpick, and then they added the raisin. The half grape was a change I made as I thought it helped pop the eyes out more and made the toothpick disappear more as I didn't want to use too tiny of a toothpick.


Then we just laid two more grapes on the plate in front of the frog for its legs.


Edible Frog Life Cycle Snack


Thank you for stopping by and checking out my first Learning About Life Cycles post. Don't miss my Caterpillar/Butterfly Lessons post. It will either post next Friday or the week after. And for the next few Saturdays I will be sharing the lists of the books I both used and "didn't have time to use but recommend" from the different units I have shared. So, stayed tuned for Picture Book Saturday to return. I will be sharing the Arctic Animals books, then the Hibernation Animals books, next will be the Tadpole/Frog books, and finally the Caterpillar/Butterfly books.
Related Posts with Thumbnails