Showing posts with label timelines. Show all posts

Friday, August 2, 2019

Reviewing History with the Timeline Collection from Home School in the Woods {A Homeschool Review Crew Review}


Last year we had the opportunity to use two of the timelines from Home School in the Woods. These were wonderful resources which helped us to review specific cultures we had learned about with our core curriculum. This year we were again given the opportunity to review a product from Home School in the Woods. This time around I was thrilled to be able to choose their Timeline Collection: A Collection of Historical Timeline Figures.


This is an amazing set of images representing people and events from the beginning of creation through modern times. I received an email with a link to the website which is where I was able to download the two zip files. After I downloaded them to our computer I admit I did need my husband to help me extract the files. Computers are definitely not "my thing" and I usually need his help for such things. There is a link to instructions on how to extract zip files, but I can't wrap my head around it. However, now that the files are extracted, I have no problems accessing them to use them.

We received the family license, meaning I can only use these with my children or a small co-op class of 12 or less children, using at most 50 timeline figures. However, they do offer both Teacher and School licenses as well. In all there are over 1,260 black and white timeline figures. These figures are available in two different sizes. There are bigger figures to be used on a wall timeline, and smaller figures to be used in a notebook timeline. This is the size I used. I wish I had wall space enough to use the bigger figures and have a timeline we can view in our room, but we make do with our smaller timelines which can be put away and brought out as needed. 

The first digital CD contains several files. 

There is a "Helps" section where you will find several specific files. There are images showing examples of using the timeline figures. a helps/copyright /usage page which opens in Google Chrome, a lapbook page which also opens in Google Chrome, and a page of timeline helps, which again open in Google Chrome. I found the helps page extremely um, helpful, for lack of a better work. It is full of ideas and tips for using the timeline figures and creating different kinds of timelines.

The next section is the "Indexes" section which contains the different time period figures, plus the bonus figures, as Chrome HTML Documents. Double clicking on a file will open it online. 


Clicking on the green button next to "Names & Dates" section will bring up a list of all the images in chronological order, along with the page number where each figure can be found.


The screenshot above shows all of the figures available in the Creation to Christ file. If you are looking for a specific figure, you can look through the list, then go back to the previous page to click on the correct page in either wall-sized or notebook-sized images, either with or without the text. 

There are five different sections of files, listed alphabetically:
  • America's History (Explorers to 21st Century AD)
  • Bonus Figures
  • Creation to Christ (Beginning to 1st Century AD)
  • Napoleon to Now (1750 AD to Modern Day)
  • Resurrection to Revolution (0-1799 AD)
The next section on the first digital CD contains the PDF files. Again there are the five different sections; however, these open in Adobe Acrobat Reader. After clicking on the time period you want to use, you then choose notebook or wall size, and then click with or without text to pull up list of pages. 


Double clicking on the page brings the page up in Adobe Acrobat Reader. 

Each page contains a number of figures. Here's a look at one page both with and without the text.


The second digital CD also contains several files. 

First you will find the "Figures," again with or without text. This file includes every single figure as an individual GIF image. Here is a look at a very small section of the images available in GIF format:


Next you will find the same "Helps" files as on the first digital CD:
  • images
  • Helps/Copyright/Usage
  • Lapbook Page
  • Timeline Helps
And there are 33 "Indexes.". These also open up in Google Chrome. You could look up figures on an alphabetical or chronological list of every single figure available, or narrow it down into such time periods as the American Revolution, Ancient China, Ancient Greece, Ancient Rome, Civil War, or Early Church, or look through the different people files, such as Authors, Composers, Explorers, Presidents, or Prophets. For example, if you click on "Ancient Rome" it will open the index in Google Chrome:


You can then click the buttons to find the image with or without text:


I'm absolutely amazed at the organization of these files and the many different ways a person can access these images to have them work for them. 

I decided to use the images found on the first digital CD. I wanted to be able to use these figures to help us review what we have learned this year in our core curriculum. We have been looking at the time from Ancient Rome through the Reformation this year. In order to find images for Ancient Rome, I had to access the Creation to Christ file. Using the PDF files it did take a bit of random clicking on each page to find the one I needed to start with. I wanted to start around the founding of Rome. I found the page that had the image for the story of Romulus and Remus:


I then realized that the pages I would need to use would also contain images for people and events from different parts of the world during the same time period. I decided I was going to use these images in two ways. First, I made memory matching cards. I started by printing out both the pages with text and without text for events spanning several hundred years (from about 800 BC to 200 BC). 


I then cut the images out and put them onto 2x3 cards I made from plain white card stock. I divided the cards into four different piles: Ancient Rome, Ancient Greece, Bible, and Rest of the World. We began with the Ancient Rome pile, reviewing information we had learned at the beginning of the year, and learning new information.


We started with a small amount and then added more.


Once a match was found, we had to read the information on the card and try to memorize the name, date, and at least one important nugget of information.


Once we had spent some time playing the game, I took the extra pages of no-text images and got them ready for building our review timeline.  I loved the suggestion in the helps section of making a notebook timeline where each page was hole punched to go into the notebook and could then be removed and set side by side. This is different from the accordion-fold timelines we have made in the past.


I set the cardstock horizontally, and drew a line down the middle of each, marking it in the middle so I could add the year.


Then we reviewed just the Ancient Rome cards to start. I organized them chronologically. Then I read the information on a card, found the image on the extra page I'd printed out, cut it out and found the correct placement on the timeline. The children then glued them on.


All of the Ancient Rome figures were placed above the line. Then, the next time we worked on the timeline, we placed the Ancient Greece figures below the line.


We then played the memory matching game with both the Ancient Rome and Ancient Greece cards, though I limited the years so the children wouldn't be overwhelmed.

I left the timeline on the table so we could see what other events or which other people were important during the time of the image on the matching cards.


We then added a second page for each year. I figured this was a great way to see what events were taking place in different parts of the world, and how it fit in with biblical history. So, the top of the second page contains Bible figures and the bottom will contain what I am calling figures from the "rest of the world." As we get further along in time, we'll have to add different categories. But for now we are working our way up to the time of Christ and the early church in our review.

I plan to store the timeline in its own binder and the cards will be in separate plastic zippy bags. That way we can play the memory match game using specific time periods I want to review.

I am absolutely LOVING these timeline figures. Amy Pak, the owner of Home School in the Woods, has done a wonderful job researching the information to put on these cards. Not only  have we been able to review information we have learned these past two years (seeing as we learned about Ancient Greece last school year), but we are learning information about people and events we didn't cover in our core curriculum. I absolutely LOVE being able to see how biblical events fit in with the rest of history. 

A lot of time and energy has been put into these timeline figures. I was amazed to learn that Amy had drawn the figures herself! And then to add on the time to get these all organized, and to offer them as GIF images as well as PDF files plus being able to access them online. It just blows my mind. The quality is amazing, the information is informative, and the images are very well done. I have to say, Ms. Pak is quite the artist. 

The Timeline Collection would be a huge asset to any homeschool. It doesn't matter what time period you are learning about, you will find images to help you teach your children, whether you are using them to make a timeline, or a lapbook, coloring pages, or just playing games for review, there are so many ways to utilize this resource. I highly recommend it. 

If you would like some more information about teaching with timelines, may I suggest you check out Amy's Blog post titled, Teaching with Timelines.

I also invite you to check out my reviews of the À La Carte products we used last year. Back in March of 2018 we reviewed Ancient Egypt with the Ancient Egypt Timeline and file folder game Tomb Dash! Then last summer we reviewed Ancient Greece with the Ancient Greece Timeline.

You can find Home School in the Woods on Facebook, Twitter, Pinterest, and Instagram.

Don't forget to click on the banner below to see what my fellow Crew Mates had to say about the different products they reviewed. In addition to the Timeline Collection: A Collection of Historical Timeline Figures that we reviewed, you will also find reviews for seven different Time Travelers U.S. History Studies and five different Project Passport World History Studies.


World History (Project Passport), U.S. History Studies (Time Travelers) and Timeline Collection: A Collection of Historical Timeline Figures  {Home School in the Woods Reviews}
Crew Disclaimer

Thursday, August 2, 2018

Hands-On History Fun with the Ancient Greece Timeline from Home School in the Woods {A TOS Review}


Earlier this year we had the opportunity to try out some wonderful À La Carte products from Home School in the Woods which really helped to enhance our study of Ancient Egypt. At that time I discovered that they also carried products that focus on Ancient Greece, which I knew we would be learning about this summer. In fact, I mentioned in my previous review that I had every intention of purchasing at least one of these products. Oh my gosh, you can imagine my excitement when I learned I was chosen to review the Ancient Greece Timeline from the À La Carte Timelines series this time around. The only thing that tempered my excitement was the fact that we were going on vacation during this review period, which limited our time with the product. Thankfully, it was simple enough to double up some days to stay on track. 


As with the Ancient Egypt materials, we received the downloadable PDF file that I needed to print out. We were provided with a Family License, meaning it was to be printed out only for use within our family. However, Home School in the Woods does offer Teacher or School Licenses as well. This timeline file opened and printed just fine using Microsoft Edge, though Home School in the Woods does have products that need to be opened in Adobe Reader to be printed properly (such as the Tomb Dash! game we had several months ago). 

In addition to the obvious computer and printer with ink, you will need to have some cardstock to print the timeline pages onto. It is recommended to use colored cardstock; however, we use white and then add color by coloring the timeline pieces. Coloring in the pieces is optional according to the instructions, but seeing as we use white cardstock, I definitely insist the children color them brightly to make them look more eye-catching. As the details on the pieces are so small, we have found the best way to color them in is to use colored pencils. Some additional supplies you will need include a hole punch (I love my 3-hole punch), a binder of some kind for the finished product, and I like to store the pages we are working on in a folder to keep things organized. 

There are two different ways these timelines can be assembled. If you choose to assemble page-by-page you will not need any additional supplies. However, if you prefer accordion-style as I do, you will need a paper cutter (or scissors) to trim the edges, plus clear packaging tape. 

When we used the Ancient Egypt Timeline I printed out the pages and cut them down to size prior to getting started. This time, we completed all the pages prior to cutting them. This was mainly so I could have a few to take with us on vacation, just in case we could get to them (we didn't). I will say, it is probably better to prepare the pages first, as I did find a few snapshot pictures that were over the space where I needed to cut. If I had cut them first, that wouldn't have been an issue, as the children would have known where the border was.

Let's look at this Ancient Greece Timeline in a bit more detail.

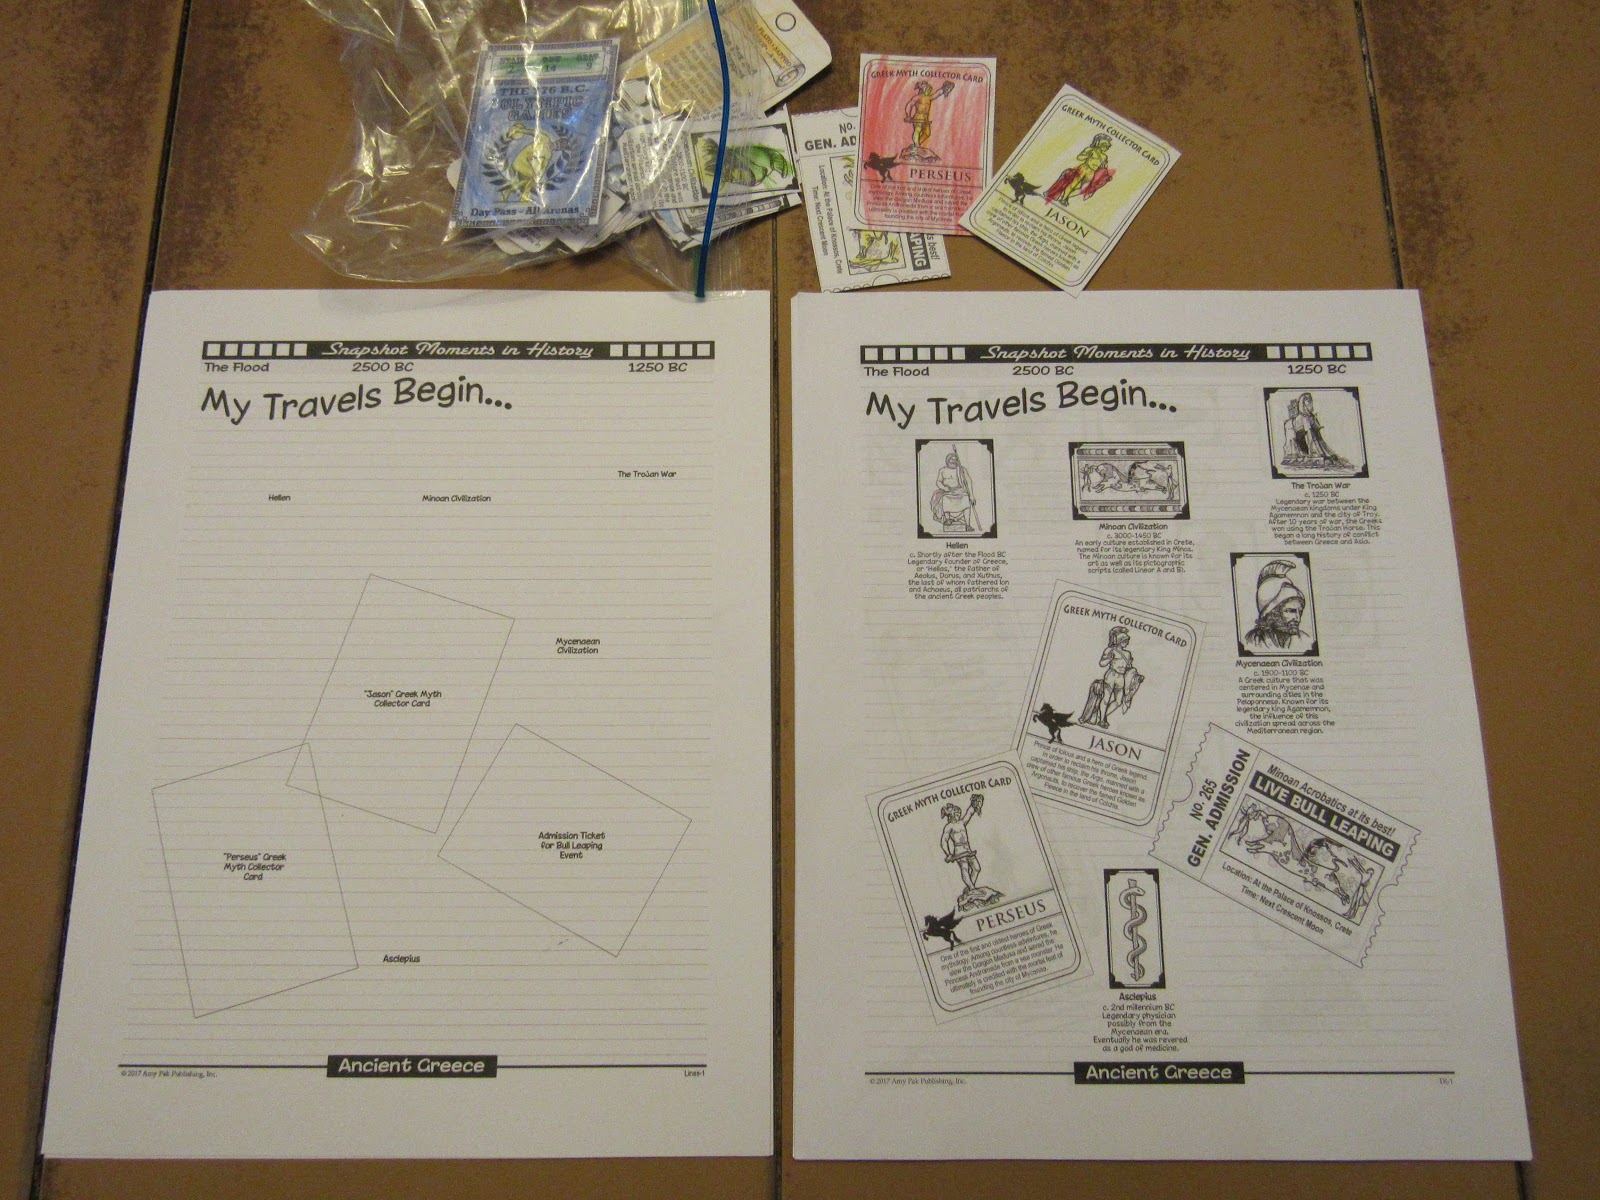
This 36-page file consists of license information, instructions & tips, plus the actual timeline pages. There are twelve timeline notebook pages, six pages of snapshot photo images with their captions, plus two pages of extras/momentos. Also included are twelve pages that show what the timeline should look like once it is complete. 

In the photo below, the pages on the left are the blank timeline pages that the children will be gluing the snapshot photo images onto. The pages on the right are teacher keys to help guide us in assembling the notebook. It really does help to have these pages when we are searching for the correct picture. I did want to mention that I used regular printer paper to print the teacher key out. In fact, when we did the Ancient Egypt Timeline, I didn't print them out at all. We just looked at them on the computer. Having done it both ways, it is a little easier to have them printed out, especially if you are going to take them with you when you work on schoolwork at the library as we did a few times this summer.


The timeline begins shortly after the flood with a picture of Hellen, the founder of Greece, and works its way in varying increments through the history of Ancient Greece, with a quick jump at the end to the 1800's where a couple of archaeologists famous for discoveries related to Ancient Greece are placed. Some of the people, places, and events mentioned were familiar to us, but we learned a lot of new information with this timeline. We work our way from the Minoan and Mycenaean civilizations, through the Greek Dark Ages, the Archaic period, the Classical period, the Golden Age of Athens, through to the Fall of Greece. 

The timeline is given a more "personal" feel with the inclusion of "momentos" such as Greek Myth Collector Cards, a pass to the first Olympic Games, a bookmark featuring one of Aesop's fables from the Bacchus House of Books, and a Library of Alexandria library card (to name a few).

How did we use the Ancient Greece Timeline?

I worked with all the children at the same time to complete this timeline. Sometimes we worked at the dining table, other times we took it to the library with us for something to do while we waited for summer reading program craft time. We worked on one or two pages at a time. I would read them the title of the caption under the picture they needed to find, then I would describe the picture and read the full description while they searched. They colored, cut, and glued it into the correct spot on their timeline. Those who worked faster got to move ahead while their sibling(s) continued to work. Every once in a while I would review all the pictures they had attached so far (giving the others time to catch up and make sure they had the right pieces). 


We made sure to work from left to right, filling in each "column" as we went so we could make sure to be working chronologically.


Harold was able to keep up with the coloring, but he fell behind on the gluing, so I just stored his in a plastic zippy bag until I had a chance to work with him individually.


Once all the pages were complete, I followed the instructions for assembling an accordion-style timeline. 


I hole-punched the first page, then trimmed the remaining pages to the correct width before taping them together.


A completed timeline:


Each one will be stored in the child's history binder. Such a wonderful resource for helping us complete our homeschool year, which spanned from the Creation through the Greeks.


These timelines are simple to put together, in fact the older girls can work independently if they choose to. Harold was able to complete his with a lot less help than he needed six months ago. And this also gave the older girls a chance to help their younger siblings, which I feel is so important.

I am very excited to see that there are two timelines we should be able to utilize next year. Home School in the Woods has a timeline for The Middle Ages, and one for The Renaissance and Reformation. I'm feeling a bit giddy right now!!

As you might be able to tell, we really enjoy these "Snapshot Moments in History" timelines. As someone who used to love scrapbooking, I really appreciate the scrapbook feel. I love the detail that is given, including the dates. We learn about so many people, various events (a lot of which I'd never even heard of), battles, leagues, and places. I love that biblical history is included. Not only does the timeline begin by mentioning the flood, but we recognized such names as Darius, Xerxes, and Queen Esther. It was wonderful to be able to place the events from the Bible in context. 

All-in-all, this timeline, like the Ancient Egypt Timeline, really did enhance our learning of ancient history. It was a great way for us to review what we had learned, and to learn new information. I do realize the children aren't going to remember all these details, but they have the timelines to flip through whenever they want to. And I loved when they were able to pick out a name or place that they had learned about previously in the year. 

I wanted to be sure to tell you some exciting news! The Crew was informed that Home School in the Woods has released their newest product titled Project Passport: Ancient Rome


This Ancient Greece Timeline is originally a part of one of the (now) five Project Passport products: Project Passport: Ancient Greece.  In fact, some of my fellow Crew Mates had the opportunity to review the Project Passport World History Studies materials. Some of the other materials reviewed are: Hands-On History Lap-Paks, Time Travelers American History, Hands-On History Activity-Paks, and Hands-On History Activity Studies.

As you can see, Home School in the Woods has a wide selection of hands-on materials to enhance your history curriculum. Don't forget to click on the banner below to go check out the reviews.

You can find Home School in the Woods on Facebook, Twitter, Google+, and Pinterest.

Hands-on-History, Project Passport, À La Carte Timelines and Time Travelers {Home School in the Woods Reviews}
Crew Disclaimer

Monday, March 19, 2018

Digging Into Ancient Egypt with Resources from Home School in the Woods {A TOS Review}


One of the benefits of being on the Homeschool Review Crew is discovering new companies to help us in our homeschool journey. While the Crew has reviewed products from Home School in the Woods in the past, this is the first time we have been on one of these reviews. We were allowed to choose a couple of their individual À La Carte products which they are now offering. I couldn't pass up the chance to use these fun products to help us review Ancient Egypt, which we have been learning about with our core curriculum. In fact, I just love the perfect timing of this review. 


We received the Snapshot Moments in History: Ancient Egypt Timeline in addition to a file folder game called Tomb Dash!, both of which were originally created for Project Passport: Ancient Egypt. We were provided Family licenses, meaning they were to be printed out only for use in our family. However, Home School in the Woods does offer Teacher or School Licenses as well.

In order to use these products, I needed to download them and open them up with Adobe Reader to print them properly. A printer with ink was also needed. I was thrilled that they were black and white, instead of color, as it is so much better on the budget. It also gives the children a chance to be more involved as they get to color their project and make it more individualized. The images from the company show colored cardstock being used for the timeline pages, but I found that white worked just fine. You will also need a few tools to complete the projects. I used my paper cutter and a three-hole punch to prep the timeline pages. Also needed for both were scissors, crayons, colored pencils, and glue sticks. 

Both of these downloadable projects have been helping us review information we had learned previously this year, plus has been teaching us new details of Ancient Egypt. 

The first project I printed out was the Ancient Egypt Timeline


This 26-page file consists of license information, instructions & tips, and the actual timeline pages. There are eight timeline notebook pages. Additionally, there are four pages of  images with their captions and two pages of extras/momentos, all of which the children needed to color, cut out, and glue onto the proper space on the scrapbook-style timeline. Also included in the download were eight pages that showed what the timeline pages should look like once complete. I did not feel it was necessary to print these out. However, if you have any confusion, you could choose to print them out, or just view them on your computer for reference.

Before the children could get started on their timelines, I had to prepare the pages a bit. There were actually two different sets of directions given for preparing the timeline: accordion-style or page-by-page. The accordian-style can be pulled out to be viewed as one continuous timeline and the page-by-page can be flipped through like a photo album. Though the page-by-page would use less cardstock as the pages can be printed back to back, I chose the accordion-style as we prefer to view our timelines as a continuous flow of history.

The first page needed to be hole-punched, while the remaining pages needed to be narrowed a bit so they could fold up properly and still be able to be placed in a binder. This is where I used my paper cutter and three-hole punch. I appreciated the detailed instructions that were provided. 


This is what a blank timeline page looks like. As you can see, the timeline is labeled so the children knew what image to look for on their sheets. 


And this is a page of images. The captions give some details about the pictures, including dates.


We completed a page a day, so it took us a couple of weeks to complete the timelines.

We made sure to work from left to right, filling in each "column" as we went so we could make sure to be working chronologically. We would figure out which image we needed, then I would read the information under each image while they colored it.


There were times we pulled out some extra resources to help dig into the information a bit more. For instance, the first picture tells us "Mizraim's people settle in Egypt." I pulled out my Bible so we could remember just who Mizraim was. In case you weren't aware, Mizraim's grandfather was Noah and his father was Ham. We had learned, earlier in the year, how Noah's descendants spread across the world after the flood. So, it was neat to have our timeline begin with this fact.


Another time the children weren't sure what a scarab was, so I used my phone to find a picture for them.


Here are their completed first pages.


They worked really hard to get their timelines completed.


 Once all the pages were complete, I taped them together so they could be placed in their history binders.


All in all, it was quite simple to put together; though Harold, who is six year old, did need help finding the correct picture and making sure he placed in in the correct spot. I believe the older girls could have completed this timeline independently. Usually I stayed by them, reading the information as we attached it to the timeline. There were times I was able to get them started and they could complete it while I cooked dinner. The older girls then helped their younger siblings. 

Before we played the Tomb Dash! File Folder Game we read through the timeline information again to prepare ourselves as the timeline included a lot of information that was also used for the question cards.


This 36-page file includes information about licenses, an introduction & tips page, assembly instructions, directions for playing the game, and the actual game components. Additionally we received an audio soundtrack MP3 file which is used as a timer for the game. The game can be played with the 15 minute timer, the 10 minute timer, or without a timer for an easier game. 

The pages I needed to print out were the game board, artifact cover chips, markers, title label, 7 pages of question cards plus the question card back on each page of question cards, the action card page plus the action card backs, and the game instructions. The remainder of the pages included in the file are duplicates provided for duplex printing.

In order to put the game together you will need a file folder, scissors, crayons, colored pencils, and glue sticks. You will also need a die to play the game.

There was a bit of prep work that needed to be done before we could play the game. The game board and markers need to be colored. I handed the people markers over to the children while I worked on the game board. Then I cut out the Question cards and the Action cards. I did not color these. If you are short on time and would like the cards to be colored, you could always print them onto colored cardstock. 

After the game board was colored I glued it into the file folder and attached the title label. The Question cards are placed in the "Boat Pits" as are the Action cards. The number of Action cards used in the game depends on the difficulty level chosen. There are a total of 16 Action cards. This breaks down to 6 Artifact cards and 10 Trouble cards. And there are a total of 126 Question cards.

Here is the game all ready to be played.


For a normal game there should be 6 of the Trouble cards mixed in with the 6 Artifact cards. Difficult and Extreme level games use 1 Artifact card per player and then you have to add in enough Trouble cards to equal a 12 card deck, so a lot more of a chance of getting a Trouble card.

Each of the people markers have a name.


The little squares are the artifact cover chips.

The object of the game is to work together to get through the tomb, collecting artifacts along the way. Each player needs to make it to the exit with 1 artifact card.


In order to move your marker you need to first answer a question correctly. 


The child to the right of the player whose turn it is will read the question from a question card. The answer is shown right below the question, so don't let the other player see the card.


The older girls would help the younger ones to come up with their answers (if they knew them).


If the player answers correctly, they get to roll the die. After landing on an artifact space the player can pick up an Action card. As mentioned above, this may be an Artifact card:


Or it may be one of several Trouble cards that hinder your ability to get through the tomb. Some are permanent troubles that you have to keep throughout the rest of the game, unless you use a turn to get rid of it. And some are temporary problems. You may have to stand on one leg for the remainder of the game, or you may have to roll a certain number to move again. And there is always a fun, adventure-related reason why these troubles come upon you, such as the passage being blocked or a wall collapsing causing dust and debris to blind you.


Once a player has an artifact they need to head toward the exit. As this is a cooperative game, players may even give another player some of their moves to help them along. 

We have yet to beat this game. We get to about where you see the markers are on the board in the picture above, and we run out of time. It took me a while to process this, but my husband made the point of saying that if there were less people playing, we would make it through the tomb faster. This makes sense as then each move would get you closer to the exit, instead of having to wait for each player to make it a few spaces at a time. I've been thinking that maybe we should start playing as teams, where the older girls each have a younger sibling to work with, using only one marker. That way each team is also responsible for working out the answers to the questions together, instead of everyone trying to help (which does feel a bit like cheating). 

Even though we haven't beaten the game yet, the children are enjoying playing, as am I. We are starting to learn our Ancient Egyptians facts pretty well. This is because I am keeping the same cards on the top of the pile for each game. Though I do shuffle them first. This way we are memorizing the information on these cards, and we can also tell when we have gotten further in the game as we reach new questions to work on. Once we have the current facts memorized, I will start changing them up.

I love that this product comes with the MP3 soundtrack files. We could set a regular timer, but it is neat to have the adventure music and sound effects going on in the background and gong sounds that go off at 5 minute intervals warning us that our time is running out. It adds a sense of suspense, especially because the music gets more intense toward the end of the game.

Both of these À La Carte products are wonderfully fun ways of reviewing and learning information about Ancient Egypt. The Timeline gives the children something in their binders that they can refer too whenever they want. And the game is just fun to play together as a family. Even more exciting is the fact that Home School in the Woods offers many more À La Carte products for different periods in history. In fact, I have every intention of purchasing the Ancient Greece Timeline and the Greek Life! File Folder Game to enhance our study of Ancient Greece, a time period we will be coming up to shortly with our core curriculum. Thankfully, these À La Carte products are quite affordable. 

You can find Home School in the Woods on Facebook, Twitter, Pinterest, Google+, and YouTube.

My fellow Crew Mates and I had a wide assortment of À La Carte products to choose from. You can click on the banner below to see what they reviewed and what they thought of them.

À La Carte Projects - Individual projects designed to enhance your studies! {Home School in the Woods Reviews}
Crew Disclaimer
Related Posts with Thumbnails