

Hands-on learning has always been important in our homeschool, though it has been neglected in recent months. So, when we were given the opportunity to try out one of the packs from Pitsco Education , I was excited, though I wondered if any of the children would be interested. I was leaning toward the Middle School STEM Creator Pack that is designed for children in grades 6-8, so I was glad when Amelia showed an interest.

Not only did Amelia show an interest, Harold was excited as well. The Creator Pack included five different STEM activities, so there was plenty of work to go around, plus some of the kits had enough materials for more than one child to join in, or for one child to do the activity multiple times.

All of the materials are provided so the student can create the main project of each kit. However, there are some materials you will need to provide to complete the challenge activities. These are mostly items that you should be able to find around your home.
- Ruler or measuring tape
- Items to use as weights for the bridge activity
- Hole punch
- Scissors
- Crayons or colored pencils
- Pencil
- Table knife
- Small toy people
- Target
- Safety glasses
- Nail or pushpin
Each activity also has a "STEM Creator's Guide" which includes step-by-step instructions, interesting and educational facts related to the project, spotlights (on bridges and simple machines), instructions for testing the project, plus pages of activities and room to record your scientific and mathematical data There are also bonus challenges and "Think About It" questions.
Step-by-step written instructions with pictures:

Informational tidbits:

Activities to test out the project and work on math, science, and engineering knowledge:

Thought-provoking questions:

Charts for recording data from the extension activities:

We began with the activity Amelia chose (seeing as she was the one who wanted to review it). I loved which one she chose, because I figured everyone could join in. Well, the ones who were interested anyway.
Creating Da Vinci Bridges
With this STEM activity, we were working on building bridges with craft sticks. Yep, just craft sticks. Pitsco Education provided a bunch of them.

The instructions are clear, though it was a bit tricky to get the craft sticks to cooperate at times, especially after the first few steps.


Getting as far as we did in the following picture was quite an accomplishment for us.

The children tried working together so someone could support the bridge while more sticks were added.
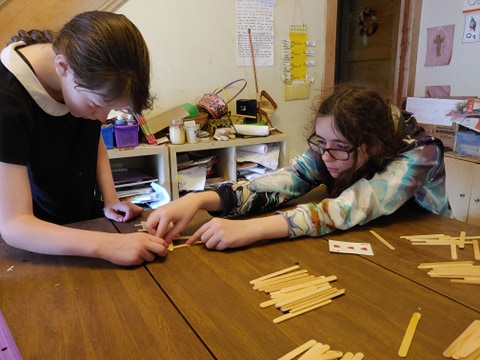
However, the children started to give up because they couldn't get past the bridge with seven sticks. They said it would be easier if they didn't get so shaky. And I admit, having good control and a steady hand is important.
I was able to continue on and make multiple bridges with 13 sticks, though even I couldn't get any further.

We did measure some of the bridges we made, but really weren't able to collect the data required to complete the chart.


I have encouraged the children to try on other days to see if they can improve. Unfortunately, we still can't get past the 13-stick bridge, definitely nowhere near the 30 sticks mentioned in the chart. Thankfully this is an activity we can try again and again, as we get to reuse the sticks.
I let Harold choose next, and, not surprisingly, he chose the one with the vehicles.
Creating Rolling Vehicles
This activity includes all the materials that actually make the vehicles, though a hole punch is needed to create holes for the straw to go through, plus crayons or colored pencils are needed to decorate it before putting it together. A table knife is also used to score the lines to aid in folding. We were thrilled that there were enough materials for two children to each make one. And there were several templates to choose from.

Some of the pictured materials are used in the activities after the vehicle is completed. Plus, we needed to have something to use as a stopwatch.
We did come upon a very frustrating roadblock while creating the cars. Unfortunately our axles didn't fit inside the holes of the cars. If they had fit properly, the children would have been able to have created these on their own. However, both mommy and daddy had to come to the rescue. I used a knife to shave away at the holes to make them bigger. Unfortunately the knife couldn't go all the way to the other side, so it took a bit of hammering on daddy's part to get them fully inserted so we could put the wheels on the vehicles. Just a little hint, it was easier to do this when the axles weren't already attached to the bottom of the vehicle.
We finally completed the cars:

And then we got to test them out. Though Hannah didn't make one, she did help with this part.

We tried the ramp out in different positions to see how far the cars would travel, plus added varying amounts of clay to the car to see if it changed the distance they would travel. Unfortunately we weren't getting consistent results, so I didn't end up recording them in the charts in the guide.
Harold wasn't too upset. He was more interested in adding the balloon to get some "jet power" going.


Unfortunately we had some more disappointment because the car design Harold used didn't seem to work with the balloon. I personally think the front window is too close to the front of the vehicle, so the balloon was touching the table.

Unfortunately, all the disappointment was causing their excitement to wane. So, they weren't too interested in completing more projects. I did insist we keep trying. Thankfully the catapult worked well for Amelia.
Creating Catapults

The catapult is made out of some really thick card stock and is quite sturdy. She had worked on this completely independently, so I didn't get pictures of her making it. But, as you can see, I have some pictures of us taking turns trying to hit the target she made. I do think she missed the part about using a paper clip to change how far the arm can be pulled back.

Let me tell you, if you pull it all the way back, those beads can fly!
Harold learned that if you just pull it back slightly, the beads won't go flying over the target. In fact, he was a lot closer to hitting it.

Next they tried their hand at creating their own invention.
Creating My Invention
With this activity there were actually a couple of invention ideas given, but no instructions on how to make them. So, both Amelia and Harold chose to try out the elevator.
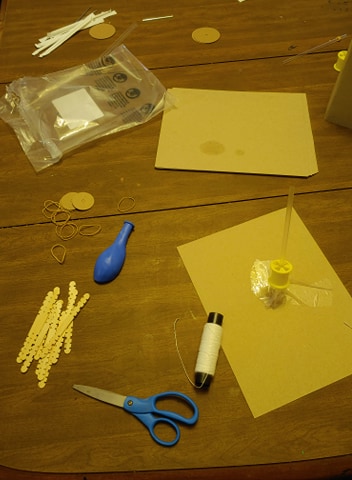


Unfortunately, though my children love trying to create things on their own, they really struggled with this and just couldn't get it to work right.
Due to all the disappointments, Amelia wasn't really interested in trying the final kit.
Creating a Friction Climber
I was able to convince Tabitha to help out for this one, the one that required the least materials (well, besides the bridges).


She'd actually done something similar before. In fact, she just wanted to go ahead and create it without the instructions, but I wanted her to use them for a few reasons.
1- I wanted to see how easy the instructions were for her to follow (she's going into 8th grade).
2- I wanted her to be able to compare with the one she previously made.
3- I wanted to know how the fiction climber would work following the given instructions.
Unfortunately, though the instructions were a breeze for her, she couldn't get the wooden plank to climb because the tape would not hold onto the wood to hold the straws in place. If I knew where my hot glue gun was, I would have had her glue them on to see if it worked better. So, sadly, another disappointment.
We wanted so very badly to enjoy these kits and the chance for some hands-on learning. Unfortunately, too many disappointments with pieces not working right discouraged and frustrated the children. I can see that with some adjustments, these could be some awesome kits. I really hope they change the size of the either the holes on the cars or the axles. I also think the instructions should tell you to glue the straws to the wood. Maybe that would allow the friction climber to work.
I will say, I love the guides. I really appreciated having written instructions with the pictures to help with making the projects. The extra activities really get the children to use their math, science, and engineering skills. And the charts are a great way to record the data (if you can get consistent data).
Though I don't feel comfortable giving this product a high recommendation, I do think with some adjustments it would be.
If you would like to try out this kit for yourself, Pitsco Education is offering a wonderful opportunity. You could enter the giveaway to win a Middle School STEM Creator Pack.
Don't forget to click on the banner below to see what my fellow Crew Mates had to say about this product and other products from Pitsco Education.


![[PREMIO2009.png]](https://blogger.googleusercontent.com/img/b/R29vZ2xl/AVvXsEjXD_Gx-wZ9EM5hXKrEYLksEBkYfRQtmb8VDVTDG_yyLggQoFIstZsh4zszdG20KqErZicRzEhiNYLty7j3IMXJYsABqkXjr8pp-ncj71xCbpxlXGbGpZq2fTuDQqq1RMKV4DPcDBnBViA/s1600/PREMIO2009.png)


