
We had the wonderful opportunity to review the Rhythm of Handwriting from the Logic of English. The Logic of English is actually "a systematic multi-sensory approach to learning how to read, spell and write." Members of the Schoolhouse Review Crew received either The Logic of English Essentials Program which is a systematic approach to Reading, Spelling and Writing, Foundations Level A which is a fun, multi-sensory approach for beginning readers or The Rhythm of Handwriting in either manuscript or cursive.


I was intrigued by the idea of teaching Tabitha cursive even though she is only in 1st grade. I have been looking for things to challenge her and The Rhythm of Handwriting seemed to fit the bill. These days I keep hearing more and more about schools dropping cursive, children not needing to learn cursive anymore because everything is so technology based. My older daughter, who goes to public school, struggles to read cursive. I knew, before the opportunity to do this review, that I was not going to neglect this important subject.
Before we received our workbook I was reading some interesting information about teaching cursive on the Logic of English's blog. Years ago I had heard that not everyone starts to learn to write by learning to print. In fact, Pedia Learning Inc., the company behind the Logic of English, recommends teaching cursive first. There are quite a few reasons for this belief.
Unlike manuscript:
Unlike manuscript:
- b's and d's cannot be reversed.
- All lowercase letters begin on the baseline.
- You only need to pick up the pen/pencil between words.
- Spacing within and between words is controlled.
- Cursive is actually less fine-motor skill intensive.
And I found this little tidbit interesting. I had never thought about the fact that cursive was designed for the human hand. Manuscript on the other hand was designed for the printing press. There are a lot more details about the benefits of cursive in the blog post found here. Reading this definitely reinforced my decision to teach cursive.

We received the Rhythm of Handwriting Cursive Student Workbook plus the Handwriting Quick Reference Cursive Chart. The book includes sections on:

- Steps to Teaching Handwriting
- Handwriting Tips
- Suggested Schedules
- Ideas for Handwriting Practice
It then moves into the pages that teach how to write the individual letters along with lines to practice writing each letter, plus additional practice pages. The lowercase letters are taught before the uppercase letters, as these are the letters that are used more frequently. The letters are taught in groups based on the beginning strokes needed.
The Lowercase Letters section is divided as follows:
- Swing Letters
- Curve Letters
- Letters that Connect at the Baseline (the section that starts teaching some words)
- Loop Letters
- Letters that Connect with a Dip Connector
- Bump Letters
The Uppercase Letters section is divided as follows:
- Curve Letters
- Uppercase Letters that Connect at the Baseline
- Uppercase Letters that Do Not Connect
- Roll Letters
- Loop Letters
- Circle Letters
- Slash Letters
- Miscellaneous Letters
It is recommended to show the child the Phonogram Flash Card for the letter you are teaching. We did not receive these cards, so I am not absolutely sure how to describe them, but they were not absolutely necessary for us because my girls already know their letters and sounds. I would think if you were going to teach cursive before manuscript they would be more of a necessity as you would still be teaching the sounds with the letter.
The Logic of English also has Handwriting Tactile Cards that I thought would be nice to have, though also not a necessity. We have sandpaper letters for manuscript letters that I purchased several years ago. I had used these with the children when I worked at the Montessori and I can definitely see the benefits of using them, especially if you have a tactile learner. With these kind of cards your child will learn the movements needed for each letter using larger motions than they would writing them. The section titled "Ideas for Handwriting Practice" gives some great ideas.
For a fun way to practice the suggested "Sky Writing" we practiced our large motion letters by going into our dark bathroom and using a flashlight to write the letters on the wall. A laser pointer would be great for that too.
We then moved to our easel chalkboard to practice letters.

Then we used the little white boards I bought. I had to draw the lines on these after every letter, but Logic of English does have a double sided white board with the lines already printed on.

I had the girls practice their writing on the easel and the white board for a while, before moving to the workbook. I would model the letter using the directions on the chart (these are the same directions that can be found in the book). The chart is really handy. It is so much easier to hold as it is just 2 sheets of heavy laminated cardstock that folds out for 4 pages of letter instructions plus a small flap that gives instructions for each of the different strokes.

When I first started teaching the letter formation I used the full instructions. For example, in order to form an "i" I would tell the girls, "Swing up to the midline, down to the baseline, pick up the pencil, dot." However, these instructions also include shortened instructions, where you can really feel the rhythm of the letter. (It is called the Rhythm of Handwriting after all.) In the instructions for each letter formation there are specific words highlighted.

In the instructions for "i" the following words are the ones needed to emphasize the rhythm: swing, down, and dot. Once Tabitha and Amelia had heard the full instructions and knew what they were to do, I then used the shortened instructions.
Tabitha wanted a chance to write some words before we got to that section. So, once we had practiced enough letters to form words I allowed her to try. The first 4 letters are: i, t, u and s. We practiced writing is, it and sit. I think they did pretty good.


We were able to do this because my girls already know all their letters and sounds and are already writing words and reading. It would be a bit different if you were teaching the sounds as you went. The books states, "Once students have learned how to write A-Z and memorized their sounds, they are ready to begin combining A-Z into short words and learning multi-letter phonograms."
Some days we will work on handwriting before bedtime. Other times I write some letters on the easel in the morning and they use the bottom lines to write their letters when they have a chance during the day.


When I thought Tabitha was ready, we started practicing writing the letters in the workbook. There are 4 different sized lines. I had her use all the different sizes to see which she was the most comfortable with. She preferred the bottom line so that is the one she has continued to use. Technically the bottom two lines are the same size, for some reason she has just been using the bottom line.
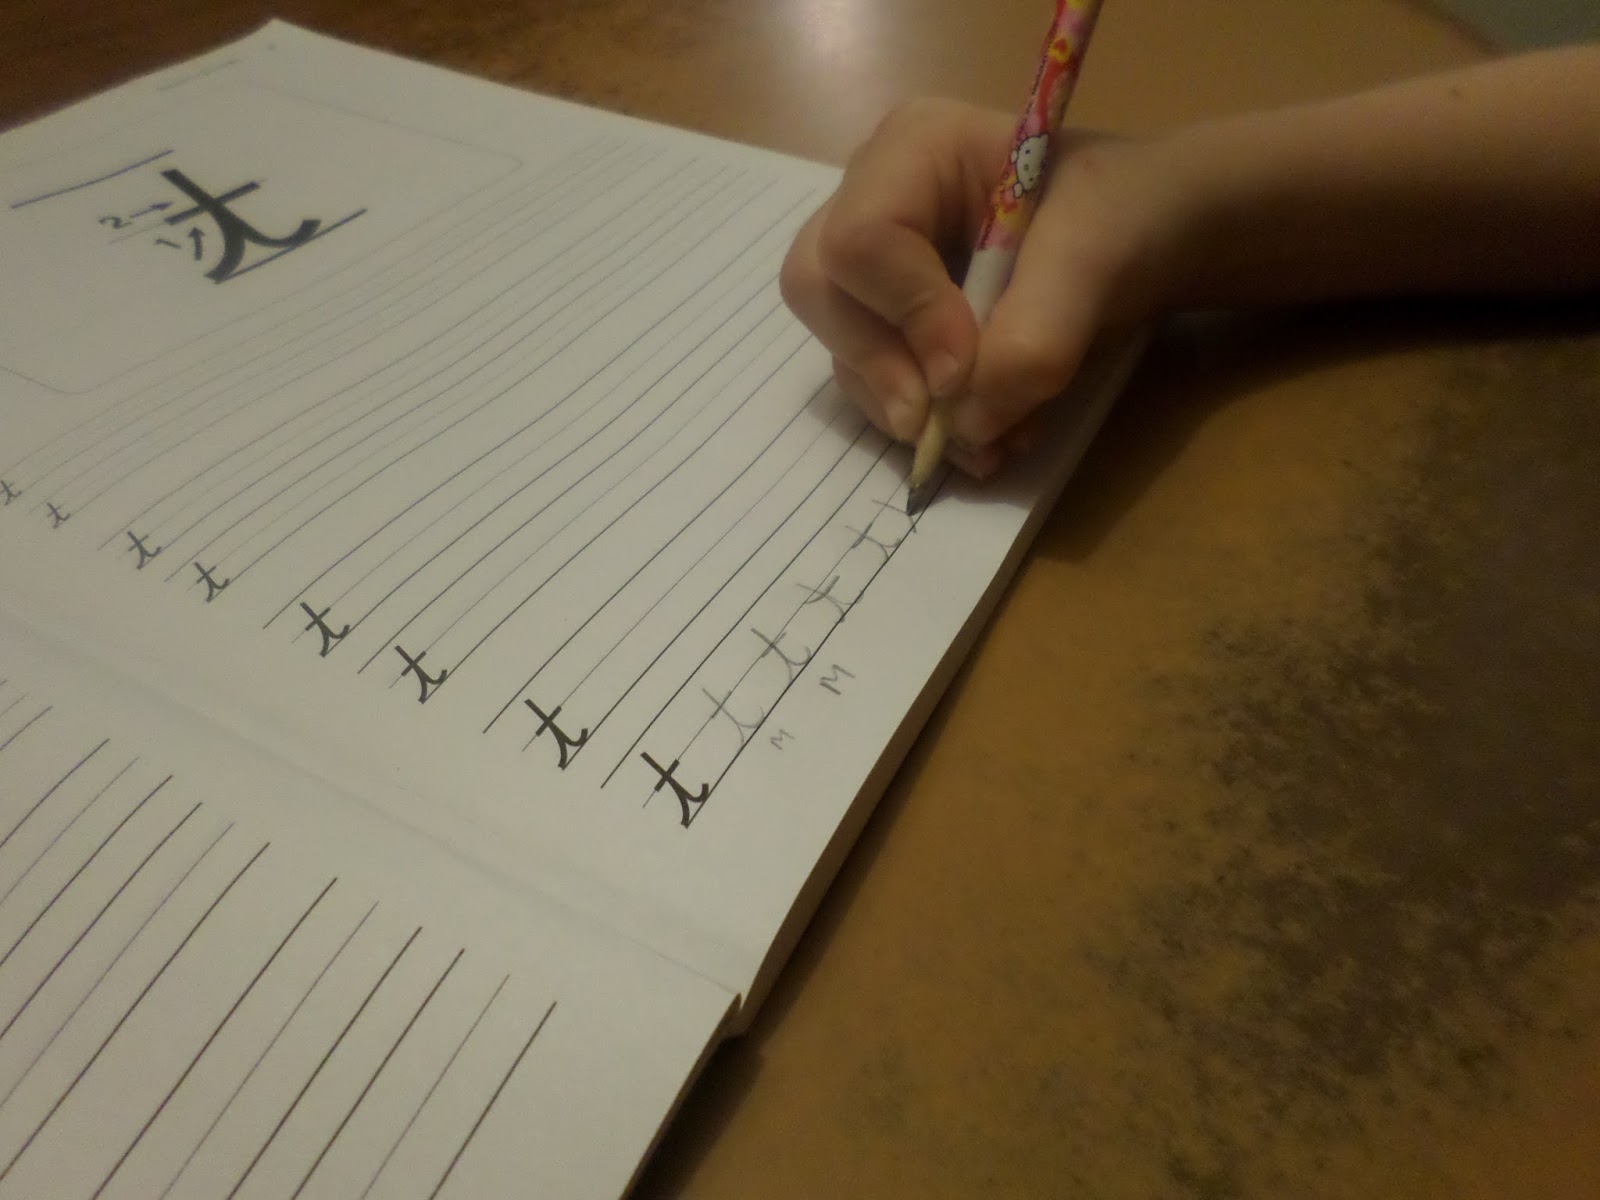
Tabitha enjoys when I demonstrate the letter on the handwriting chart page. I will form the letter once while reading the instructions, then she will put her finger on top of mine so she can feel the proper motion.

We are not quite following the suggested schedule as I do not want them to be overwhelmed. It is suggested for children 6 and under to learn one letter a day. We have been working on the letters at a rate of 2 per week. We have learned all the "swing" letters and will be moving on to the "curve" letters next. I can foresee us speeding up to 3 letters a week as we have become more familiar with the program.
I am really enjoying this opportunity to teach Tabitha, and at times Amelia, cursive handwriting. I love the suggestions and the tips in the book. The order in which the letters are taught is quite logical. Using the shortened instructions with the bold words has definitely emphasized the rhythm of the handwriting. The words chosen to describe the motions are perfect (swing, glide, swoop and scoop to name some of my favorites). As an added benefit I have been able to work on my own handwriting.
Tabitha was really hesitant at first, she thought it would be too difficult. However, now she is excited to learn every new letter. I think she has gained confidence and can see how well she can do. She says she likes this book, "Because I can write s's and they're my favorite. I like that I 'm having fun with it and can do it with you (mom)." I asked her what makes it fun? And she said, "Doing it with you."
The Rhythm of Handwriting is recommended for ages 7 and up, but we have been using it successfully with the girls and they are 5 and 6.
You can purchase the Rhythm of Handwriting Cursive Student Workbook for $15.00. The Manuscript workbook is available for $18.00. The Handwriting Quick Reference Chart is $10.00 for either the cursive or manuscript. There are other resources available in their store to use with the Rhythm of Handwriting book, such as the Tactile Cards and the Whiteboard. You can check them out here.
You can also find The Logic of English on Facebook and Twitter.


![[PREMIO2009.png]](https://blogger.googleusercontent.com/img/b/R29vZ2xl/AVvXsEjXD_Gx-wZ9EM5hXKrEYLksEBkYfRQtmb8VDVTDG_yyLggQoFIstZsh4zszdG20KqErZicRzEhiNYLty7j3IMXJYsABqkXjr8pp-ncj71xCbpxlXGbGpZq2fTuDQqq1RMKV4DPcDBnBViA/s1600/PREMIO2009.png)


No comments:
Post a Comment
Thank you for visiting my blog today. I love to read your comments, so please leave me one if you have the time.
Blessings