

- A seasonal round-up (toward the beginning of the month)
- A guest post featuring crafts, activities, tips, snack ideas or other early childhood topics. (toward the end of the month)
- Posts where I share what I have been up to with my preschoolers and/or early elementary children.
Each week, I will host a link up, where you can share either what you have been up to recently, or old posts that may go with the theme. Feel free to link up more than one post.
Each week I will continue to feature a couple of posts from those that have been linked up.
I hope you will continue to share your wonderful posts, and I hope you will find something new to try with your child(ren).
It would be great for everyone to stop by and visit the other linked-up posts as well. Check them out, leave some comments, pin those that interest you. Let's make this a real party and socialize with each other.
I am starting something new this month. I have decided it would be fun to highlight 1 or 2 of the posts that was shared on Littles Learning Link Up in the previous month. This isn't the same as a feature though. With the highlighted post, we will actually be making the craft(s) or participating in the activity. You will get to see how much we enjoyed it, and I will be mentioning any tweaks that I add. Of course I will be linking back to the original post.
Last month Katie from A Little Pinch of Perfect shared these cute Painted Paper Plate Turkeys. I just knew we had to make these to decorate our home for Thanksgiving. They were simple to make, and I only changed a couple of things.
It would be great for everyone to stop by and visit the other linked-up posts as well. Check them out, leave some comments, pin those that interest you. Let's make this a real party and socialize with each other.
I am starting something new this month. I have decided it would be fun to highlight 1 or 2 of the posts that was shared on Littles Learning Link Up in the previous month. This isn't the same as a feature though. With the highlighted post, we will actually be making the craft(s) or participating in the activity. You will get to see how much we enjoyed it, and I will be mentioning any tweaks that I add. Of course I will be linking back to the original post.
Littles Learning Link Up December Highlight
Last month Katie from A Little Pinch of Perfect shared these cute Painted Paper Plate Turkeys. I just knew we had to make these to decorate our home for Thanksgiving. They were simple to make, and I only changed a couple of things.
Paper Plate Turkeys


For each turkey you will need:
1 paper plate
Red paint
Yellow paint
Orange paint (or you can mix your own orange for a color mixing lesson like we did)
Brown construction paper
Red construction paper
Orange construction paper
White card stock (or construction paper)
Black marker
Glue stick
Paint brushes
Child size scissors
And adult scissors for the adult to cut the paper plate
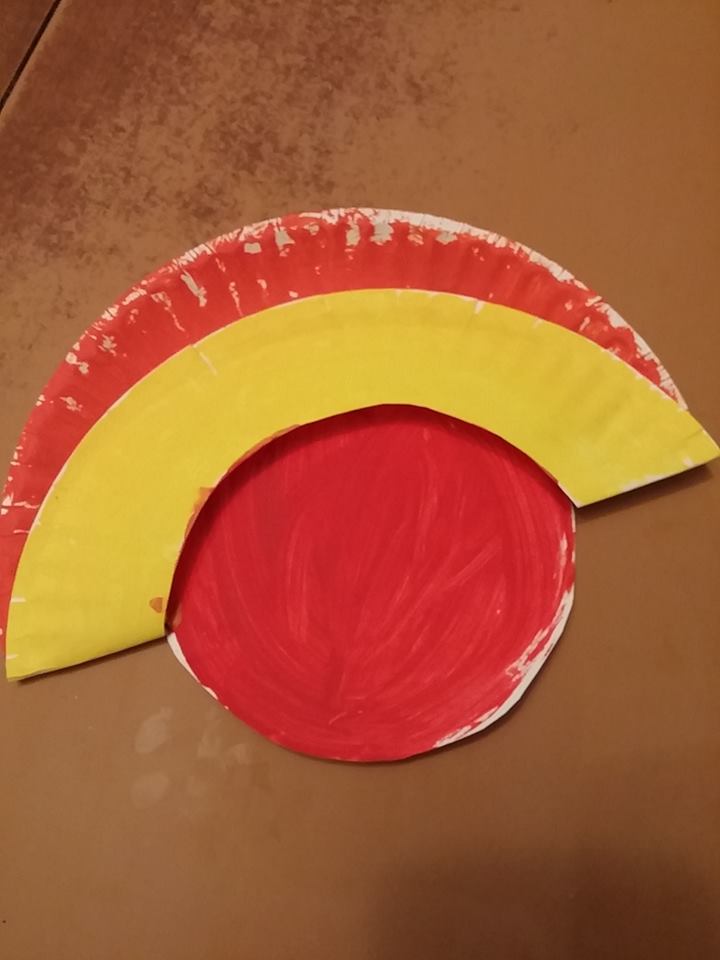
I started out by cutting the paper plate between the ridged edge and the center circle. It is cut halfway around the circle. Then the center circle is painted red.

I set up "stations" to allow the children to work on each part of the turkey at their own pace. While Tabitha worked on painting her turkey, Amelia was making her turkey's head. More on that in a bit.

While Tabitha worked on her turkey's head, Hannah painted her turkey. You get the idea.

After painting the center circle, half of the outer circle was painted orange. Make sure to paint the part that is not cut.


While we waited for the front of the plate to dry, they worked on their turkey heads.

The older girls cut out their own circles and legs, though I did cut them out for Hannah and Harold. I had also cut out the eyes, beaks, and snoods.

Harold did a great job following the example and gluing together his turkey's head.


When the front was dry, the children painted the back of the cut outer ridge circle. Once it was dry, we folded it up to create the other tail feathers.
The children were given the option of cutting a fringe or just leaving it uncut.

I cut mine of course. Then the turkey's head and legs were glued on.

We did not have to glue or tape the yellow section to the orange section to get it to stay up. All you need to do is press the edge down so it sort of turns the plate ridge inside out. I'm not sure how else to explain that part.
Aren't they cute?

Now onto:
Littles Learning Link Up Features
On my last Littles Learning Link Up post, there were 21 wonderful posts linked up!
I will be picking one randomly selected post to share, plus the top clicked-on post.
Don't forget to stop by other posts that are linked up. See what catches your eye, stop by, pin the post to a relevant board, and perhaps leave a comment to let the author of the blog know you have been by for a visit. I know I appreciate others commenting and letting me know they have read my posts, so I am sure others do too.
This week's Randomly Selected Post is:

Tara from Homeschool Preschool shared Santa Beard Craft with Free Template.
Here is the top clicked-on post:

Adelaide from Unhurried Home shared Getting Rid of the Toys.
Join the Party!
I would love to have you join in this week! What sort of activities do you do with your young children? Do you have some favorite activities you would like to share? I invite you to link up below. I will be pinning posts on one of my relevant boards, and I would love to feature some of the activities each week from what is linked up.
Please know I may share a picture from your post and link back to it, along with sharing how we used your idea in our school time. By linking up you are giving me permission to use a picture from your post. I will ALWAYS give credit and link back. Additionally, if you choose to try out any of the ideas with your child, please make sure you give credit where credit is due.
Linky will be open through Monday night, to give me time to check out all the posts and get the Features organized. Please take the time to visit some of the other wonderful posts linked up.


![[PREMIO2009.png]](https://blogger.googleusercontent.com/img/b/R29vZ2xl/AVvXsEjXD_Gx-wZ9EM5hXKrEYLksEBkYfRQtmb8VDVTDG_yyLggQoFIstZsh4zszdG20KqErZicRzEhiNYLty7j3IMXJYsABqkXjr8pp-ncj71xCbpxlXGbGpZq2fTuDQqq1RMKV4DPcDBnBViA/s1600/PREMIO2009.png)


Your turkeys turned out cute! :)
ReplyDeleteWhat a fun and cute craft project! Thanks for sharing and for hosting! Hope you and your family had a nice Thanksgiving :)
ReplyDeleteCute turkeys!
ReplyDeleteThanks for sharing at the #LearningKid linkup.