Tuesday, December 1, 2015

Wordless Wednesday: December 2, 2015 (w/linky) - Our Family Has Gotten Bigger

My oldest son got married this past weekend. That just doesn't seem possible. He found himself a wonderful young lady and we are so glad we get to welcome her into the family. The wedding was beautiful and the children were so excited to be included. The girls were flower girls and little Harold was the ring bearer. Yes, there are going to be a lot of pictures. You have been warned.

Let's start with the preparations, shall we.

We arrived at the bride's house and headed up to the bedroom where all the other ladies were getting ready.


The bride was getting a bit claustrophobic, so we headed downstairs.


I was not expecting her to have any desire to do the girls' hair. She sure surprised me. Personally, I wonder if doing their hair was helping to calm her nerves.


Final preparations for the bride.


I had to share the following picture. It is the only one I was able to snap of the girls heading down the aisle. As I am the mother of the groom, I was escorted down the aisle right before them, and I couldn't get my camera ready in time.


Yes, Steven, your bride is on her way.


Here comes the bride.


Now, it just so happens that the bride's father is also the pastor, so he gave her away and then headed up the steps so he could perform the ceremony.


He may have been embarrassed just a little bit.


The little one was being a bit difficult. No shock there.


Time for the rings.


You may now kiss the bride. 
Kissy, kissy, smoochy, smoochy.


The happy couple


Cutting the cake


Father-Daughter dance


My son stepped in to dance with his bride.


We joined a group headed out to decorate the car.


Looking forward to seeing your Wordless (or not so wordless) Wednesday posts this week.


Tots and Me


Littles Learning Link Up: December 1, 2015 Craft Highlight: Paper Plate Turkeys


 Each month you will find:
  • A seasonal round-up (toward the beginning of the month)
  • A guest post featuring crafts, activities, tips, snack ideas or other early childhood topics. (toward the end of the month)
  • Posts where I share what I have been up to with my preschoolers and/or early elementary children.
Each week, I will host a link up, where you can share either what you have been up to recently, or old posts that may go with the theme.  Feel free to link up more than one post.

Each week I will continue to feature a couple of posts from those that have been linked up. 

I hope you will continue to share your wonderful posts, and I hope you will find something new to try with your child(ren).

It would be great for everyone to stop by and visit the other linked-up posts as well. Check them out, leave some comments, pin those that interest you. Let's make this a real party and socialize with each other.

I am starting something new this month. I have decided it would be fun to highlight 1 or 2 of the posts that was shared on Littles Learning Link Up in the previous month. This isn't the same as a feature though. With the highlighted post, we will actually be making the craft(s) or participating in the activity. You will get to see how much we enjoyed it, and I will be mentioning any tweaks that I add. Of course I will be linking back to the original post. 

Littles Learning Link Up December Highlight

Last month Katie from A Little Pinch of Perfect shared these cute Painted Paper Plate Turkeys. I just knew we had to make these to decorate our home for Thanksgiving. They were simple to make, and I only changed a couple of things.

Paper Plate Turkeys


For each turkey you will need:

1 paper plate
Red paint
Yellow paint
Orange paint (or you can mix your own orange for a color mixing lesson like we did)
Brown construction paper
Red construction paper
Orange construction paper
White card stock (or construction paper)
Black marker
Glue stick
Paint brushes
Child size scissors
And adult scissors for the adult to cut the paper plate

I started out by cutting the paper plate between the ridged edge and the center circle. It is cut halfway around the circle. Then the center circle is painted red.


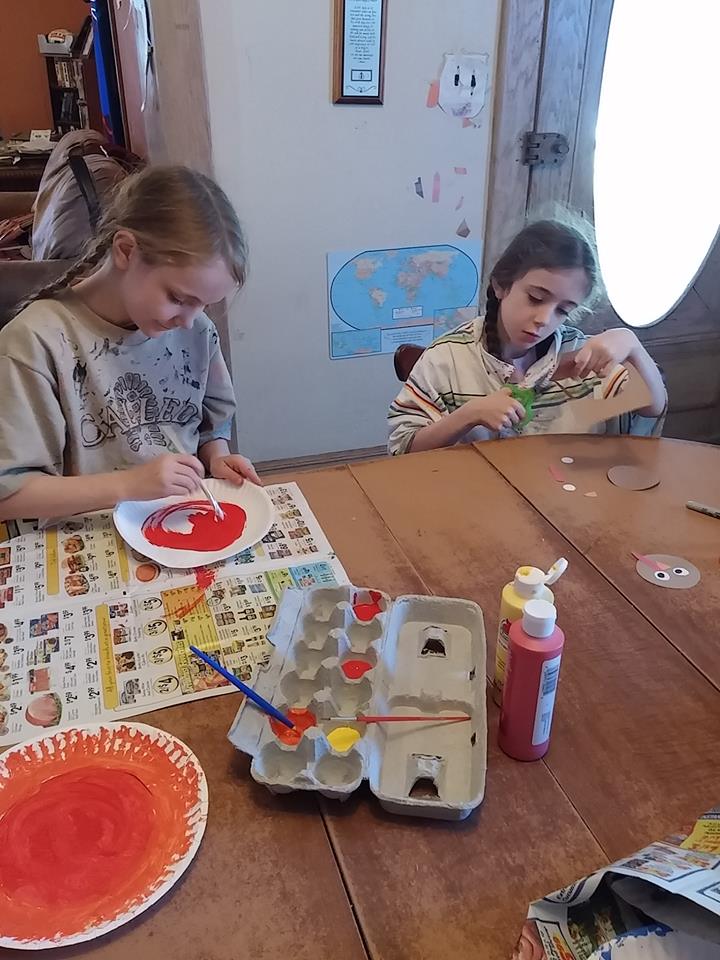
I set up "stations" to allow the children to work on each part of the turkey at their own pace. While Tabitha worked on painting her turkey, Amelia was making her turkey's head. More on that in a bit.


While Tabitha worked on her turkey's head, Hannah painted her turkey. You get the idea.


After painting the center circle, half of the outer circle was painted orange. Make sure to paint the part that is not cut.


While we waited for the front of the plate to dry, they worked on their turkey heads.


The older girls cut out their own circles and legs, though I did cut them out for Hannah and Harold. I had also cut out the eyes, beaks, and snoods.


Harold did a great job following the example and gluing together his turkey's head.


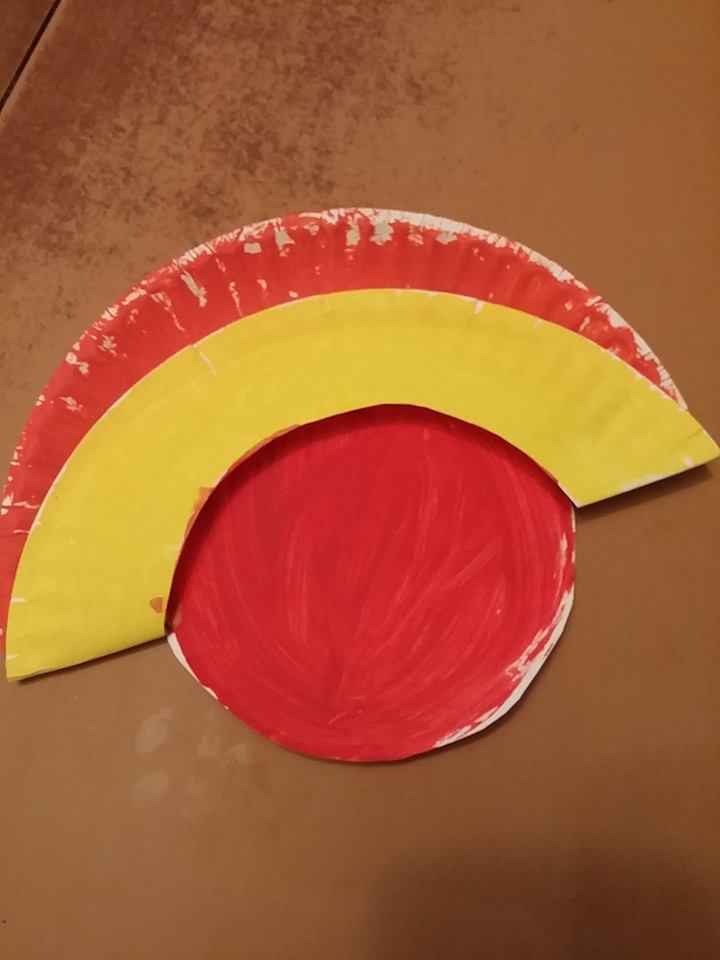
When the front was dry, the children painted the back of the cut outer ridge circle. Once it was dry, we folded it up to create the other tail feathers.


The children were given the option of cutting a fringe or just leaving it uncut.


I cut mine of course. Then the turkey's head and legs were glued on.


We did not have to glue or tape the yellow section to the orange section to get it to stay up. All you need to do is press the edge down so it sort of turns the plate ridge inside out. I'm not sure how else to explain that part.

Aren't they cute?


Now onto:
Littles Learning Link Up Features

On my last Littles Learning Link Up post, there were 21 wonderful posts linked up! 
I will be picking one randomly selected post to share, plus the top clicked-on post.  

Don't forget to stop by other posts that are linked up. See what catches your eye, stop by, pin the post to a relevant board, and perhaps leave a comment to let the author of the blog know you have been by for a visit. I know I appreciate others commenting and letting me know they have read my posts, so I am sure others do too.

This week's Randomly Selected Post is: 


Tara from Homeschool Preschool shared Santa Beard Craft with Free Template.

Here is the top clicked-on post:


Adelaide from Unhurried Home shared Getting Rid of the Toys.

Join the Party!

I would love to have you join in this week! What sort of activities do you do with your young children? Do you have some favorite activities you would like to share? I invite you to link up below. I will be pinning posts on one of my relevant boards, and I would love to feature some of the activities each week from what is linked up.

Please know I may share a picture from your post and link back to it, along with sharing how we used your idea in our school time. By linking up you are giving me permission to use a picture from your post. I will ALWAYS give credit and link back. Additionally, if you choose to try out any of the ideas with your child, please make sure you give credit where credit is due.

Linky will be open through Monday night, to give me time to check out all the posts and get the Features organized. Please take the time to visit some of the other wonderful posts linked up.

Photobucket

Monday, November 30, 2015

Tuesday's Giveaway Link Up- December 1, 2015

Tots and Me
Welcome to Tuesday's Giveaway Link Up with your hosts Karen @ Tots and Me, Emily @ Emily Reviews, Shelly @ The Attic Girl, and Rena @ An Ordinary Housewife.

So glad you could join us as we share our giveaways on  Tuesday's Giveaway Link Ups. 

This link up will be posted Monday at 7 PM est. and run all week long! Make sure you stop in as often as you can to list your latest giveaways.

Here is how to use the Giveaway Link Up

1. Post your reviews and/or giveaways, as many as you have, be sure to add the end date (family friendly please)

2. Help spread the word about the giveaway link up by grabbing our button, Tweeting or posting on Facebook. (Not mandatory- but it helps get more exposure to your giveaways as well!)

3. Take a moment to enter any giveaway that strikes an interest to you!

If you would  like to follow the  hostesses, we will gladly follow you back! Simply leave us a message to do so.

Featured Giveaways

Suffragette Movie Prize Pack US only Ends 12/7


$25 Amazon Gift Card US only Ends 12/7


$200 Paypal Worldwide Ends 12/10


Thank you for linking up with Karen @ Tots and Me, Emily @ Emily Reviews, Shelly @ The Attic Girl, and Rena @ An Ordinary Housewife.


E is for...Egg Carton Math Mat

Cristi from Through the Calm and Through the Storm and Meg from Adventures with Jude are hosting this great weekly party called Blogging Through the Alphabet. All are welcome to join in, just make sure to keep your posts family-friendly. I am determined to stay faithful this time around. I might not always post on the same day of the week, but I have every intention to post something each week.

Here is how I decided my "theme" for this round of Blogging Through the Alphabet. As I was going through old blog posts recently, I noticed I have some neat ideas for activities and crafts that I did with in the past. Unfortunately, I always included them in my weekly wrap up posts or more recently in Poppins Book Nook posts, so they sort of got buried. I can't really share them as individual activities or create pinnable images to promote them and share my ideas, which is why I started this blog in the first place (to share my ideas with others who work with children). So, I am going to make new posts for these ideas.

I have found there is a huge benefit in this strategy. I am remembering  ideas that I had forgotten, which means I can now do these activities with the younger children. I will be sharing the old pictures and possibly sharing new pictures of the younger children participating. In fact, this is the second week where I wasn't sure what I was going to post about, and through searching my blog I found activities I had completely forgotten about.

Five summers ago I focused on one number a week with Tabitha and Amelia. We made a number book and did number crafts. I also came up with a fun way to display our numbers. Then I used that activity to further the girls' math knowledge during the following school year. 


E is for . . . Egg Carton Math Mat

I printed out a picture of an egg carton and wrote "How many eggs?" on the bottom. Then I added Velcro strips to each cup, plus one piece to the middle of the lid. I also cut out little oval "eggs" and put the other side of the Velcro on the back of them. 


Originally this egg carton paper was attached to our poster. I had made paper strips which had the number written out plus the numeral. The girls were to a place the number strip to the carton and then attach the correct number of eggs. As we made our way through the summer, more and more eggs filled our egg carton.


As I mentioned, during the next school year I then thought this would be a fun way to work on math skills. Specifically, the concept of zero. First I asked the girls if the egg carton was full or empty. When they told me it was full I took one egg away at a time, each time asking if it was now empty. Finally, it was empty and they learned that there were zero eggs in the egg carton.


Then we worked on some subtraction.  I made up some equation cards from 1-12, plus some number cards for the same amounts. 

These equation cards looked like this:

The Numeral - Empty Box with Question Mark = 0

I put the card above the egg carton and the girls had to put the correct number of eggs in the carton.


Then I asked them how many eggs they would have to take away to make it empty again, to equal zero. They used the number cards. These cards were just square pieces of paper that fit over the square on the equation card.


They found the right number, and took away the eggs. Then they put the numeral card in the equation.


Both Tabitha and Amelia enjoyed this hands-on math activity. They were only 3 and 2 years old at the time.

This can also be used for general addition and subtraction practice for numbers up to 12.


Blogging Through the Alphabet” style=
Related Posts with Thumbnails