- A seasonal round-up (usually toward the beginning of the month)
- Posts where I share what I have been up to with my early elementary children (including occasional highlight posts where I share how we used ideas that have been linked up here on Littles Learning Link Up).
Each week, I will host a link up, where you can share either what you have been up to recently, or old posts that may go with the theme. Feel free to link up more than one post.
Each week I will continue to feature a couple of posts from those that have been linked up.
I hope you will continue to share your wonderful posts, and I hope you will find something new to try with your child(ren).
It would be great for everyone to stop by and visit the other linked-up posts as well. Check them out, leave some comments, pin those that interest you. Let's make this a real party and socialize with each other.
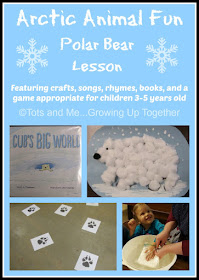
We are continuing our Arctic Fun unit in the Pre-K class at our homeschool co-op. The first week we learned about polar bears and how they keep warm. The second week we learned about the arctic fox and camouflage. The third week, we learned about the walrus, and discussed sinking and floating. Last week, our fourth week, we learned about the snowy owl. We discussed where they live, how big they are, and talked about their super eyesight and hearing.
I have been sharing my Pre-K unit posts on Fridays this month. However, it is on Tuesdays that I have been sharing the craft that we made. This week's craft is one that popped into my head a couple of days before we had co-op. I already had the empty toilet paper rolls because I had been planning a different craft for a different animal, but then I decided I wanted to do the Snowy Owl instead.
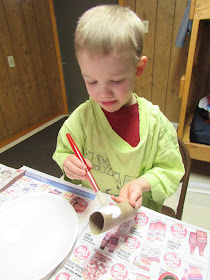
We started by painting the toilet paper rolls white. I had the children put the paper towel roll over a few of the fingers of one hand, and then they painted with the other hand.
Let's take a look at that review schedule real quick:
The Crew year has begun. So far I have four reviews due in February. We received the newest Heirloom Audio Adventures release titled, For the Temple. Three of the children have been using the IXL Learning site, which we have a year membership to. We will also be reading the newest books in the Secret of the Hidden Scrolls series. We reviewed the first two books a year or so ago. And finally, I will be working with Harold on math using Singapore's Dimensions Math.
It would be great for everyone to stop by and visit the other linked-up posts as well. Check them out, leave some comments, pin those that interest you. Let's make this a real party and socialize with each other.
We are continuing our Arctic Fun unit in the Pre-K class at our homeschool co-op. The first week we learned about polar bears and how they keep warm. The second week we learned about the arctic fox and camouflage. The third week, we learned about the walrus, and discussed sinking and floating. Last week, our fourth week, we learned about the snowy owl. We discussed where they live, how big they are, and talked about their super eyesight and hearing.
I have been sharing my Pre-K unit posts on Fridays this month. However, it is on Tuesdays that I have been sharing the craft that we made. This week's craft is one that popped into my head a couple of days before we had co-op. I already had the empty toilet paper rolls because I had been planning a different craft for a different animal, but then I decided I wanted to do the Snowy Owl instead.
Toilet Paper Snowy Owl Craft
You will need:
Empty toilet paper rolls (one per project)
Yellow construction paper
Black construction paper
White cardstock
Cotton balls
School glue
White acrylic paint
Black marker
Paintbrush
In preparation I cut 1 inch circles out of yellow construction paper and 1/2 inch circles out of the black construction paper for eyes. Then I cut little triangles out of the black construction paper for beaks. Finally I cut wings out of the white cardstock. They are about 4 1/2 inches long, though I didn't measure them until after the owls were already made
We started by painting the toilet paper rolls white. I had the children put the paper towel roll over a few of the fingers of one hand, and then they painted with the other hand.
We let them dry while we sang some songs and did some other activities. When the children came back from gym we finished the owls.
Unfortunately I don't have any pictures of the actual steps because the glue wasn't coming out of the bottle lids, and the other teacher and I had to apply the glue with our fingers. Which of course meant I wasn't able to use my camera at the time.
I had the children assemble the eyes by placing a little glue on the yellow circle and attaching the black circle. Then they attached the eyes to the owl body, and then the beaks. They drew talons on the bottom of the body and then glued on a small bit of cotton over the top of each "foot" to represent the soft, warm feathers. We attached the wings last as they needed to be held to make sure they didn't fall off.
And there you go, cute little Snowy Owls, quite simple to put together.
The Crew year has begun. So far I have four reviews due in February. We received the newest Heirloom Audio Adventures release titled, For the Temple. Three of the children have been using the IXL Learning site, which we have a year membership to. We will also be reading the newest books in the Secret of the Hidden Scrolls series. We reviewed the first two books a year or so ago. And finally, I will be working with Harold on math using Singapore's Dimensions Math.
Here are a few things I would like to share with you:
More of our Arctic Fun
Now onto:
More of our Arctic Fun
Littles Learning Link Up Features
On my last Littles Learning Link Up post, there were 11 wonderful post linked up. I will be featuring a randomly selected post and the most clicked on posts.
Please, don't forget to stop by other posts that are linked up. See what catches your eye, stop by, pin the post to a relevant board, and perhaps leave a comment to let the author of the blog know you have been by for a visit. I know I appreciate others commenting and letting me know they have read my posts, so I am sure others do too.
This week's randomly selected post is:
Tanya from The Natural Homeschool shared Free Montessori Curriculum List & Resources {Printable}
This week's most clicked on posts are:
Kelly from Our Everyday Harvest shared Celebrating the 100th Day of Homeschool {Kindergarten Activities}
Brandy from The Barefoot Mom shared 5 Reasons to Read Aloud to Your Kids Even After They Become Proficient Readers
Join the Party!
I would love to have you join in this week! What sort of activities do you do with your young children? Do you have some favorite activities you would like to share? I invite you to link up below. I will be pinning posts on one of my relevant boards, and I would love to feature some of the activities each week from what is linked up.
Please know I may share a picture from your post and link back to it, along with sharing how we used your idea in our school time. By linking up you are giving me permission to use a picture from your post. I will ALWAYS give credit and link back. Additionally, if you choose to try out any of the ideas with your child, please make sure you give credit where credit is due.
Linky will be open through Monday night, to give me time to check out all the posts and get the Features organized. Please take the time to visit some of the other wonderful posts linked up.
No button currently, and there won't be one until I can figure it out seeing as Photobucket has changed things. Feel free to still share the picture in place of the button. Just link it to my Littles Learning Link Up permalink please.
I am sharing over at
I am sharing over at


No comments:
Post a Comment
Thank you for visiting my blog today. I love to read your comments, so please leave me one if you have the time.
Blessings