For another activity we made Purple Playdough. We used the recipe found in the book, "Slow and Steady Get Me Ready" by June R. Oberlander. It calls for 1 cup of flour, 1 tbs oil, 1 cup water, 1/2 cup salt (we ran a little short and it came out fine), 2 tsp cream of tartar and food coloring. You need to cook it over medium heat until it forms a ball,


(no the fire was not on yet)
then knead it until smooth.


(here they are blowing on it to cool it down)
It can be kept in a plastic bag indefinitely.


(she loves to make wormies)
Well, it has taken a while, but we finally had a chance to introduce the sandpaper letters. I decided I will introduce them in the same order recommended in "Mommy, Teach Me to Read" by Barbara Curtis. Tabitha knows the sounds already from working on the Starfall website. She was easily able to find the correct sound for me and trace them.

I feel the tracing is really going to help her. We say the sound as we trace the letters with our index finger and middle finger.
I also have a movable alphabet that I printed from the Montessori Materials website. The link for this website is found at Barbara Curtis's website Mommy Teach Me. I printed them, cut them out and "laminated" them (okay, I use contact paper). I was glad to find these to print out. I had actually started a game with Tabitha a couple of months ago. We used the word cards I regularly use for our lessons and the new Scrabble Slam game cards we got for Christmas. I pulled out the cards needed for each word and showed Tabitha one word at a time with the letters randomly laid out above the word card. She was to place them in order. I would have her tell me what the first sound was and have her find it and place it below the word. We did this in order until the word was complete. I made a couple of mistakes with this first attempt. In using the word cards (we were on Nn at the time) I ended up trying to have Tabitha do words that were too long and difficult to sound out. In addition, the Scrabble Slam cards were too big to fit under each letter neatly. So the game was put on hold until I could rectify the problems. I had just recently started rereading the "Mommy, Teach Me to Read" book and happened to find the movable alphabet. And I started making word cards with only 3 letter phonetic words. Once again I made a mistake by choosing words alphabetically, thus starting with Aa and Bb. She had trouble with the words, I believe, because I didn't start with words starting with continuous sounds. Such as words starting with Mm and Ss. And once again she didn't seem too interested. So I will try again this week. Here are pictures of us playing the game, same as described above with the Scrabble Slam cards.


It didn't help that I was already frustrated because I had to separate all the letters before we could play because I stored them in a plastic bag. And they got messy as we changed from one word to another. So, because I couldn't find anything to store them in, I made my own storage container from egg cartons, cutting a slit in the side of each compartment so the letters would fit without bending.


This week I also let Amelia use the toothpick activity. She loved putting the toothpicks through the holes of the shaker, over and over and over.


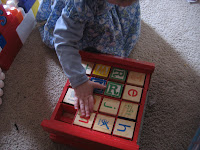
I also noticed something that wasn't quite an "activity" but helped with Amelia's fine motor skills. We were cleaning up and I decided that letting Amelia put the letter blocks away would be good for her:


If you can't tell, each block needs to go into a square compartment and she had to turn it just right to fit it in.
I also made a Pattern File Folder Game for Tabitha.


Another activity I put together this week and has been a huge hit was found at The Activity Mom blog. She had found it at Tired, Need Sleep where you can go to print out the templates. It was so simple, just print them out, cut out the required shapes in craft foam and you're ready to go. When I first let Tabitha do this activity I just had it in a file folder and she turned the pages over onto the table when she was ready for the next letter. Since then I was able to make it to the store and this activity is now stored in sheet protectors in a binder, as suggested by The Activity Mom.


While doing the C, she reached over for the other curved shape and proceeded to make an O:

To see what others are doing with their preschoolers go on over to Homeschool Creations and check out Preschool Corner.


What fun P week!! Love the purple playdough. :)
ReplyDeleteSo many fun ideas! I like the way you stored those letters in the egg carton. Also love your pattern file folder game!
ReplyDeleteExcellent post! I love your purple playdough. We *tried* to make purple playdough once, using red and blue food coloring and it just kind of turned out gray. How did you get yours to be such a nice purple?? You have so many great ideas here for the letter P, I'm amazed you were able to do all of this! I'm glad you are enjoying the letter templates. :)
ReplyDeleteI love these build a letter activities! I need to make this for this week :-) You guys did some great activities this week.
ReplyDelete