Pages

Friday, November 30, 2012

Lovin' the Weekend Blog Hops: November 30-December 2, 2012


Welcome to Lovin' The Weekend Blog Hops with your co-hosts:

Thank you to every one who has stopped by, whether this is your first visit or you have been a faithful ongoing participant!

We would love for you to stop by each of the co-hosts and follow us, then feel free to add your links to any or all of the following linkies.

 We also randomly choose a Featured host each week from the Lovin' The Readers linky. This week we are featuring Book Review Diva . 

Book Review Diva

Here's what she has to say:
"Book Reviewer, Blogger, Reader of all things Romance (Paranormal & Historical) I love to read a lot, I usually read for about two hours or so before bed. Sometimes I get caught up in a book, and read for over two hours, I have to force myself to put down my book.
I have been blogging since Feb 2010 and I have three other websites as well:
Historical Romance Books
Vampire Books
and
Paranormal Romance

each of these websites feature all of my book reviews that are in the historical genre, vampire genre, and paranormal romance genre."
If you need anymore info on her blog you can visit her blog, Book Review Diva.
You can also visit her on Facebook and Twitter

Don't forget to link up to the Lovin' the Readers Hop if you would like a chance to be a Featured host next week. Please comment with a way to contact you, especially if there is not an obvious way mentioned on your blog. We would love to include a little write up about you and your blog in the next week's Lovin' The Weekend Blog Hop post, including a link to your blog. And you will get to include the linky codes on your blog. Sound fun? We're looking forward to getting to know our readers better.

Here's how this blog hop works. We would appreciate it if you would follow Tots and Me, Adventures of a Mommy Homemaker and An Ordinary Housewife then please head on over to our Featured Host and follow as well. If you no longer have GFC please follow in some other way. After that there are three different linkies you can link to. Whichever one you choose to link to, please grab that button and share it on your blog (the codes are on Tot's and Me's sidebar). We'd love it if you could tweet or in some other way share about this blog hop, the more people who know about it, the more potential visitors and new followers of your blog. We'd love to meet some new friends this weekend.  

Some people are more interested in just increasing their numbers, while others really want people who appreciate their blog and want to keep up with their posts. So, there are two separate linkies. The third linky is for you to link up your giveaways.

If you are interested in increasing the number of followers to your blog via GFC, Linky Followers, email, Twitter, Facebook or Google+ link up here. We will follow you back if you follow us (just note which one you are linking to):

Tots and Me


If you are interested in gaining followers to your blog who will read and comment and truly find an interest in your blog, link up here:

Tots and Me

If you have family friendly giveaways to link up, here's your spot. Please make sure to include an end date for your giveaway.

Tots and Me


We are so glad you stopped by. Please leave a comment if you link up and we will be sure to stop by and follow back.

Don't forget to check out my "Blog Hops" page for other great weekend blog hops!!

My Word Magnets Kid's Super Bundle Review and Discount Offer

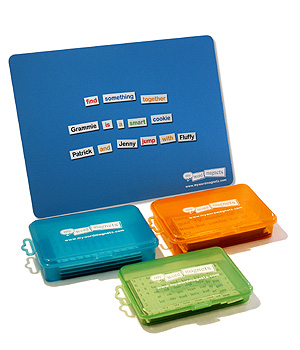
Perhaps you remember the Back to Preschool Blast Giveaway that I had back at the beginning of the school year. One of the products I had the opportunity to review was the My Word Magnets Kids' Super Bundle. Unfortunately, I did not get a good chance to review this until just recently, and now I wish it hadn't taken so long as the children are having a blast with this product. But, more on that later. First, I assume you would like to know a little bit about the product.

My Word Magnets offers 4 different kits of magnets.

You can choose from the Ultimate Edition Kit and the Light Edition Kit for older members of the family, or the Kids' Edition Kit and the Kids' Super Bundle (which is the kit I was privileged to review), which are both for younger children.  The Kids' Super Bundle comes with 381 Word Magnets, plus 15 custom Word Magnets. When you are at the Word Magnets Site you can enlist the help of Wendell the Wizard to choose your Custom words if you so wish and you get to play in the sandbox, which gives you and your child an idea of how you will be creating sentences with your magnets. You may click here to go to my Back to Preschool Sponsor Spotlight post to see what I had to say. 
Each Word Magnet is approximately 1/2 inches high and 1 mm thick. The length varies depending on the word. The words that are included in this Kit include Sight Words and Fun words and other words, plus word fragments such as endings (ed, ing, s) to help create words that make sense in the sentences you will be building. It also contains two sets of numbers (0-9), punctuation, and math symbols. What I thought was wonderful for the kids' edition, is that they color code the words. Red are verbsgreen are adjectivesblue are nouns, and orange are others. In addition to the Word Magnets themselves, the kit includes a sturdy storage case that has a clasp on it to keep it from opening and a Super Safety Board on which to use the magnets (because there is no way my girls are taking this product out to the kitchen to use them on the refrigerator so they can lose them all).

The magnets in the My Word Magnets Kits come attached together as sheets that you will need to separate. 


In order to make the separation process a fun activity, I decided to take the magnets and organize them a bit. I wanted to see how many Sight Words were included in the kit. I was pleased to see that most of the Dolch Sight Words are contained in this Kit, though there were some missing that still have me wondering why they weren't included. There are no number words, just the numerals.  And I believe a lot of the nouns can be found on the Dolch Noun List, which I just discovered the existence of this evening. So the selection of words the children will be working with will really help their reading. As they play with these magnets they will become familiar with the all important sight/high frequency words in a fun way. 

I did want to mention that I noticed, while separating the magnets, that it is better to bend them backwards and forwards instead of tearing them apart. The tearing motion left the edges more ragged. 

Now, I bet you are wondering how the children like these Word Magnets. As I said, they loved helping separate them into piles. When we initially separated the magnets I would hand one to Tabitha or Amelia and have them tell it to me. I then found it on a sight word list I had printed out and had them put it in the correct pile. At another time, when we were ready to build sentences, I had them separate them by color, so it would be easier to find the correct part of speech we were looking for. Not that the girls understand what nouns, adjectives and verbs are right now, but I can see where just playing with these magnets they will have a better understanding. I had to restrain myself from trying to get all technical on them. 

They enjoyed separating the words into piles.


This is Tabitha's first attempt at writing some sentences with the magnets. 


She was pretty proud of herself.


Amelia really wanted to get in on the action.


And then she wanted to do one of her own. At this point she is just putting words on the board, but I need to find a chance to work with her. I feel this will be a great tool to help her in learning new words and practicing sounding out words.


Here they are again, taking up the entire table sorting out the words by color.


I decided we would try some of the game suggestions in the instructions.  
We played Scrambled Egg Sentences. 

I think I started out a little hard actually. Tabitha wanted to make it say, "The princess is beautiful happy." When I was looking for, "The beautiful princess was happy."


So I made them a little easier. Even Amelia got in on this game.


She made this sentence, and I explained to her we would need to add a question mark. 


Then we rearranged the words to answer the question.


And Tabitha decided to act out being a funny dog.


They had a blast making Super Silly Sentences and Adding-a-Word.


Then I had them complete some sentences. I gave them 3 words to choose from. 


There are quite a few games we didn't play.
Word Riddles
Scavenger Hunt
Guess the Connection
Describing Words
Improvisations
and 
Triplets

There are so many educational opportunities with My Word Magnets. I plan to use them to help Amelia practice reading words in a fun way. Tabitha is starting to see how sentences are formed. And she has talked about (though she didn't get a chance to) writing the sentence she created and giving it to a friend. I love to see them so excited to learn.

If you would like to find out more about My Word Magnets, head on over to their site. You can also follow them on Facebook and Twitter. 

Wait! There's more!
If you are thinking this would be a wonderful gift for someone you love, My Word Magnets is offering a special discount for what they are calling "Gray Friday." You can get
30% off each of these bundles plus 10 FREE Bonus Word Magnets by using the code shown:

MYGRAYFRI12BUN    Kids' Super Bundle
MYGRAYFRI12ULT    Ultimate Edition Kit
MYGRAYFRI12KID    Kids' Edition Kit
MYGRAYFRI12LIG    Light Edition Kit


Disclosure: I received My Word Magnets Kids' Super Bundle for free in order to review it. This did not in any way influence my review. I only recommend products I use personally and feel will be a good products for my readers.

25 Days of Christmas 2012- November 30th: Christmas Themed Book Suggestions

victorianchristmas - 29

I am thrilled to be able to share so many great posts this month in anticipation of Christmas with the 25 Days of Christmas Blogshare. 
Today's post is brought to you by Alyson from Sniffer Walk

     Now that Thanksgiving has passed, Christmas seems right around the corner!!  Well, today's featured post and giveaway is being held at SnifferWalk. The featured giveaway is a fabulous book about celebrating life so that we can live it day by day, and truly savor each experience while exploring all of the subtleties of love and happiness.  We also have a special featured post to help you find that special Christmas-themed book to read for a brief escape from all the stress. Who doesn't need a special lift for themselves at this crazy busy time of year?
     Alyson has put together a terrific list of some of the best Romance, Paranormal and Fantasy books that are Christmas themed.  
To check out the whole post and enter today's fun-filled giveaway, go here
(Just a quick note that there are adult themes on the linked blog)

Enter to win a different prize each day, from Nov. 29th through Dec.24th, with the 25 Days of Christmas Blogshare Giveaways! Each day we will be highlighting a post from one of our  blog partners. Look for the link daily that will take you to the blogshare post of the day. By clicking on the day link you will find the rafflecopter form to enter each of the 25 Days of Christmas Giveaways!

Thursday, November 29, 2012

Kids and a Mom in the Kitchen #31: Nn-Nests for Dinner

Time for Kids and a Mom in the Kitchen
(A weekly linky where you can share your special time in the kitchen, such a great place for learning. You can also link up Kid-Friendly Recipes)
Photobucket


The linky is at the bottom.

We have been focusing on the letter N and Nests for a couple of weeks. Well, I guess we took a week off for Thanksgiving. When we are finished with Nn-Nest we will be focusing on Advent and Christmas until the new year, so I hope to have some fun Christmas recipes to share in December. But for now, I would like to share not 1 but 2 fun recipes for edible nests. The first is a dessert/snack recipe that is in our teacher manual. The second is one I came across earlier this week and I was thrilled by the timing. I knew I would have to try this great looking breakfast/brunch nest. The girls were supposed to help me with both, but they got a bit bored and wanted to go play, so I let them.

The edible dessert nest is quite simple. You use shredded wheat for the grass, chow mein noodles for the twigs (though it was suggested to me that pretzel sticks could work), and a mixture of chocolate chips and peanut butter for the mud.

You'll need:
2 large shredded wheat biscuits
2 Cups Chow Mein noodles
1 cup chocolate chips
1 cup peanut butter

The girls are getting ready to shred the Shredded Wheat.


Then they decided to be birds when they were picking out the twigs, I mean chow mein noodles.


And Tabitha continued to be a bird while dumping the chocolate chips into the saucepan where they would be melted with the peanut butter on low.


Then we added the Shredded Wheat and Chow Mein Noodles to the melted chocolate/peanut butter and stirred.


After it was sufficiently mixed together, I divided it into 4 "glops" and shaped them into nests. 


While they were in the refrigerator firming up I made supper. It is Thursday again, so I figured it was a great time to have these Potato Nests I found .  

You mix together:
A 20oz pkg of Frozen Shredded Hash Brown Potatoes (I let them thaw a bit.)
1 small grated onion or several green onions chopped fine
2 Large eggs, beaten
1 cup shredded cheese (your choice, we use Cheddar)
1/2 cup Parmesan Cheese (Which I forgot, oops)
Salt and Pepper


Then you divide the mixture into muffin cups sprayed with nonstick spray. You push them down and form a dip in the center to make it look like a nest. I actually didn't put enough in. I ended up with extra mixture after dividing it, and thought maybe I did something wrong. So I decided to put the extra into a different muffin tin and cook it later. I should have added it, but they already looked so full.


They are to be cooked on 400 for 25-30 minutes. 

They ended up a bit thin making them difficult to remove in one piece.


Then we filled them with scrambled eggs topped with crumbled bacon.


These additional Potato Nests were thicker and look better, though they still didn't come out very well. I don't think I used enough spray.


The girls didn't really like them because they had onions in them. Hubby and I on the other hand thought they were great.

After dinner the other nests were ready. I added grapes for eggs. 


Do you have your children help you in the kitchen?  What lessons do they learn? Do you have any kid friendly recipes to share?

I'd love to see your posts, whether you have done something this week or some time in the past. Just link up below. This is a weekly linky.

I am linking up to:


Photobucket

Blog Post HopHappy Go Lucky


And here is my Kids and a Mom in the Kitchen linky